Pages

Monday, August 23, 2010

Smoke Portrait

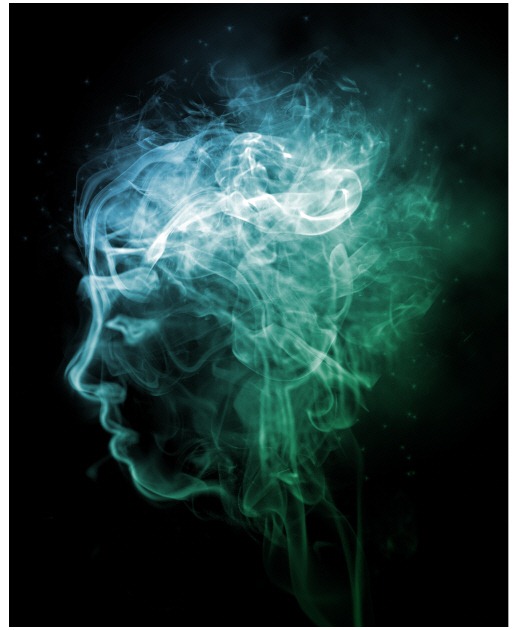
I was so impressed the day I saw this "smoke art" photo effect. I decided to recreate it using Photoshop and ended up with the result shown below. Seems complicated? Keep on reading and you'll be surprised how easy it is to do

Preview of Final Result
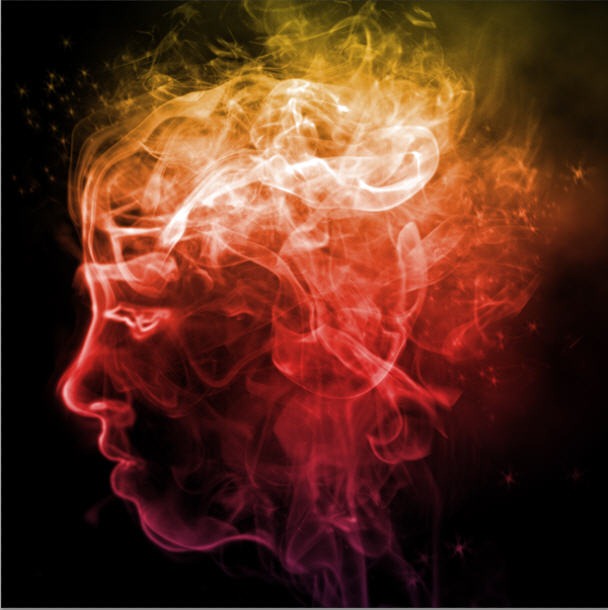
Smoke Portrait

Smoke Portrait Photoshop Tutorial

Before we start, notice that this tutorial was written using Windows OS, so for Mac users simply alter Ctrl with CMD, and Alt with the Opt key.

Tutorial Details

  • Program: Adobe Photoshop CS or newer version

  • Difficulty: Medium

  • Estimated Completion Time: 1 to 2 hours

Resources:

Step 1 - Extracting the Model

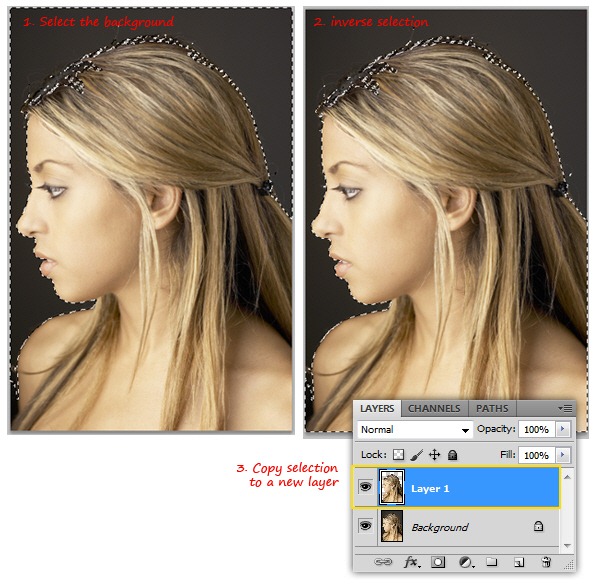
Open the stock model image in Photoshop and use the Magic Wand tool to select the background. Go to Select > Inverse (Ctrl+I) to invert the selection, then duplicate the selected area by pressing Ctrl+J. In the Layers panel, you will see a new duplicated layer.

Note: This stock photo belongs to katanaz-stock. Please do not redistribute or sell this image without permission! Thanks.
clip_image002

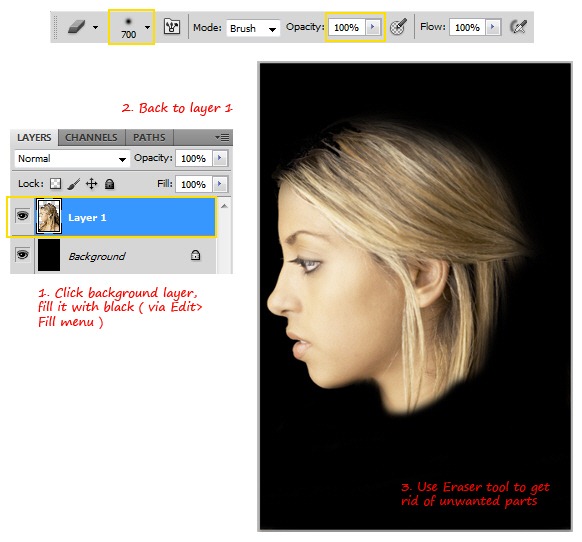
Click on the Background layer, and fill it with black. Go back to Layer 1 and erase the extra parts of the image using the Eraser tool until you have just the head left. Make sure you pick a soft round brush with 100% opacity when erasing the image.
clip_image003

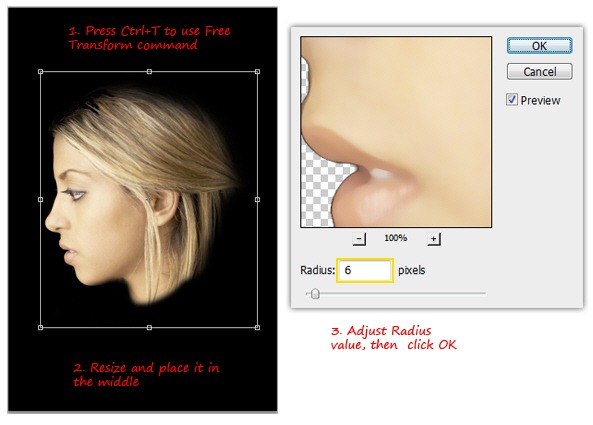
Resize the head to make it smaller, and then place it in the middle of the canvas. Now soften the image by using the Median command on the Filter menu. Choose Noise > Median. Adjust the Radius value to around 5 to 7px. Click OK when you're done.
clip_image004

Step 2 - Creating Smoke Guide Lines

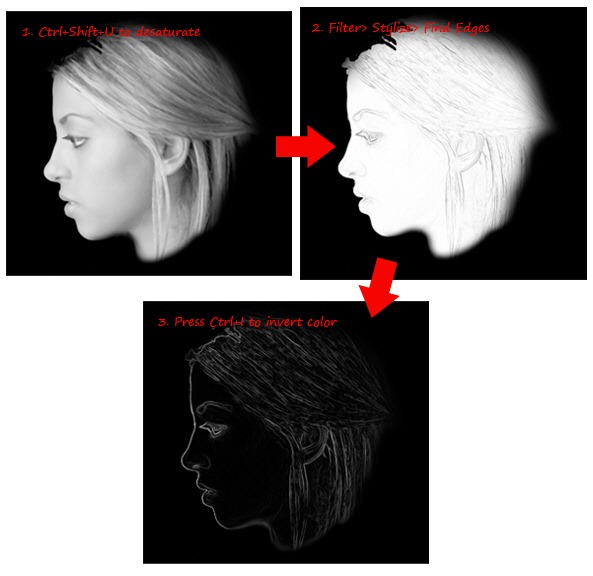
Desaturate this layer by going to Image > Adjustment > Desaturate, or simply press Ctrl+Shift+U. Then use Filter > Stylize > Find Edges to create a sketched line effect. What we will need is the opposite, so invert the color by pressing Ctrl+I and the line color will turn white. That’s it! Now the image can be used as a guide to create smoke art.
clip_image005

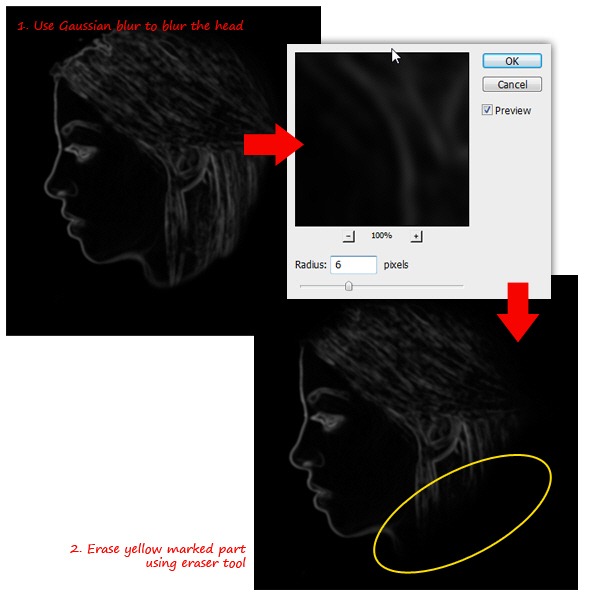
Make the head blurry by selecting Filter > Blur > Gaussian Blur. Adjust the Radius value to around 6px, click OK to apply Gaussian Blur Filter. Remove the unwanted areas (marked with the yellow circle shown below) in the neck and hair by using the Eraser Tool.
clip_image006


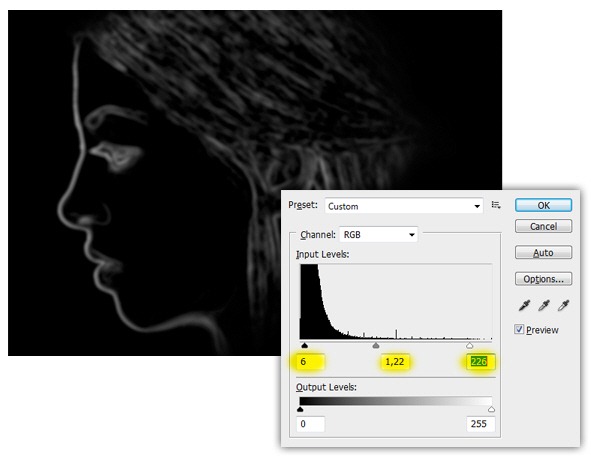
Still using the same layer, press Ctrl+L to shown the Levels dialog. Adjust the shadow, midtones and highlight values to increase the image contrast so that the black area gets darker and white area gets brighter. See image below for a quick guide. When finished with Levels, click OK to apply the change.
clip_image007

Step 3 - Adding Smoke

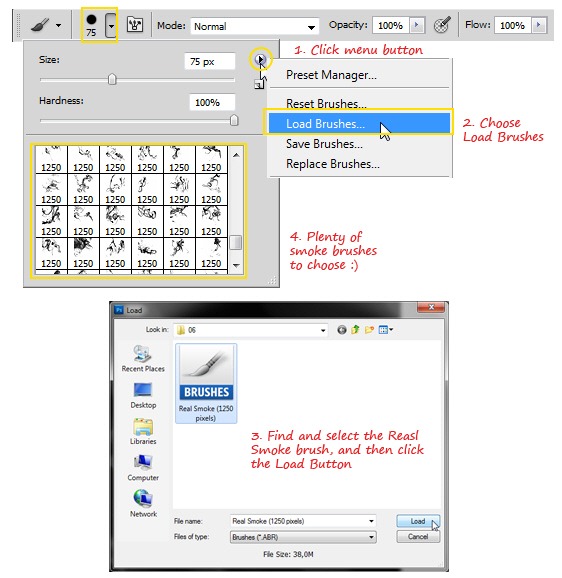
Pick the Brush Tool and click the Menu button from the preset brush picker and select Load Brushes. Locate where you saved the smoke brush and select it by clicking the Load button.
clip_image008

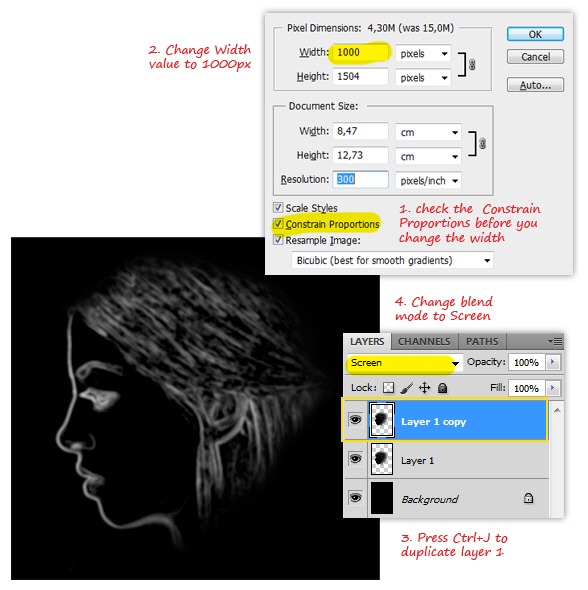
This smoke brush has plenty of smoke shapes. Since the default size is 1250px (quite large since the image size is only 1800px), you will need to change the image size to 1000px before using this smoke brush. To do this, go to Image > Image Size menu.

Duplicate Layer 1 by pressing Ctrl+J, then change the blend mode to Screen. The white lines are supposed to be brighter right now.
clip_image009

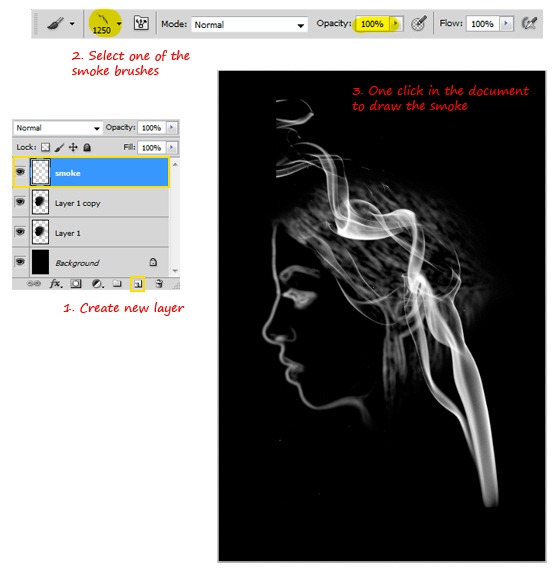
Create a new layer on top (optional: rename it to Smoke1). Still using the Brush tool, choose one of the smoke brushes. Create the smoke shape with one click (make sure the brush Opacity is 100% and the brush color is white).
clip_image010

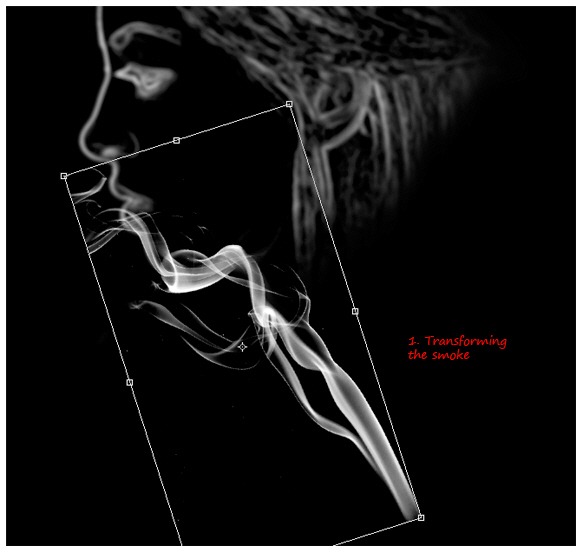
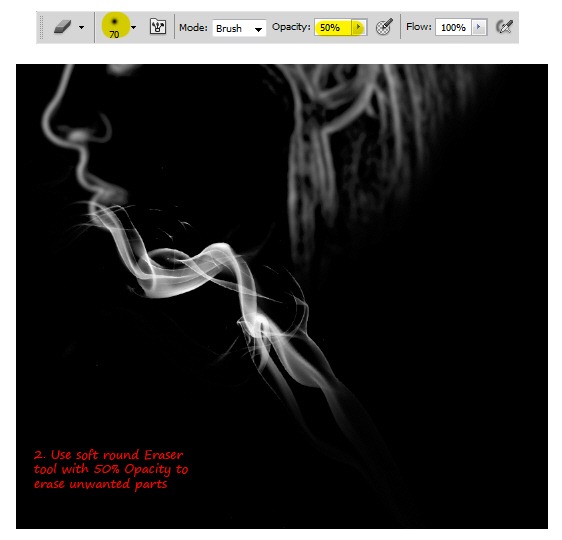
Resize the smoke to make it smaller and reposition it however you like (i.e. the outlining the chin area). Now here is the tricky part. Think about how you need to warp the smoke so that it follows the chin shape. Erasing the unwanted smoke parts is the first step you should do. Use the Soft Round Eraser tool with 50% opacity to do this.
clip_image011

clip_image012


Step 4 - Reshaping the Smoke

To reshape the smoke, choose one of the following steps (or a combination of the two):

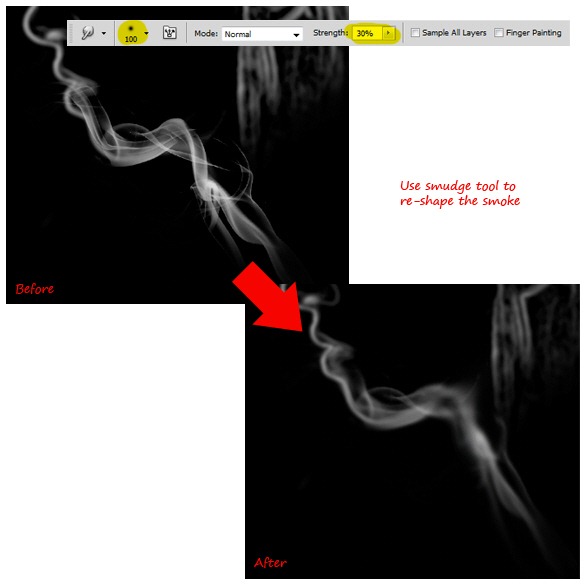
Option 1: Use the Smudge Tool with 30% Strength to push and pull the smoke to outline the chin shape. See illustration below for more details. Note: Using the smudge tool will also blur the smoke.
clip_image013

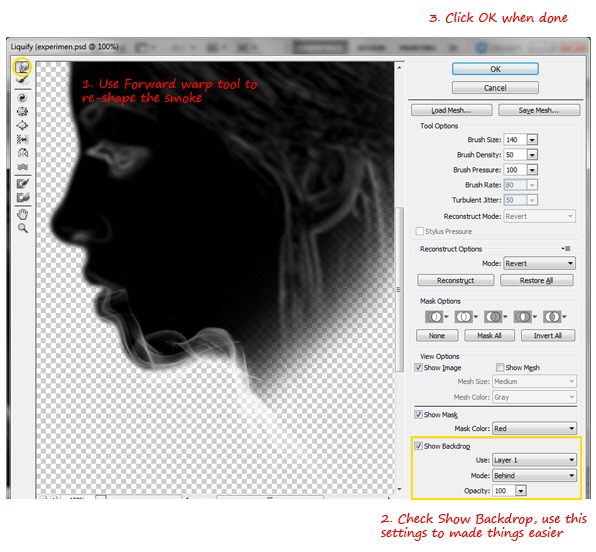
Option 2: Go to Filter > Liquify. Use the Warp Tool to push and pull the smoke to outline the chin shape. Click OK when you're done. Note: to simplify these steps: Click Show Backdrop ON, use Layer 1, select Behind as Mode, and set Opacity to100%.
clip_image014

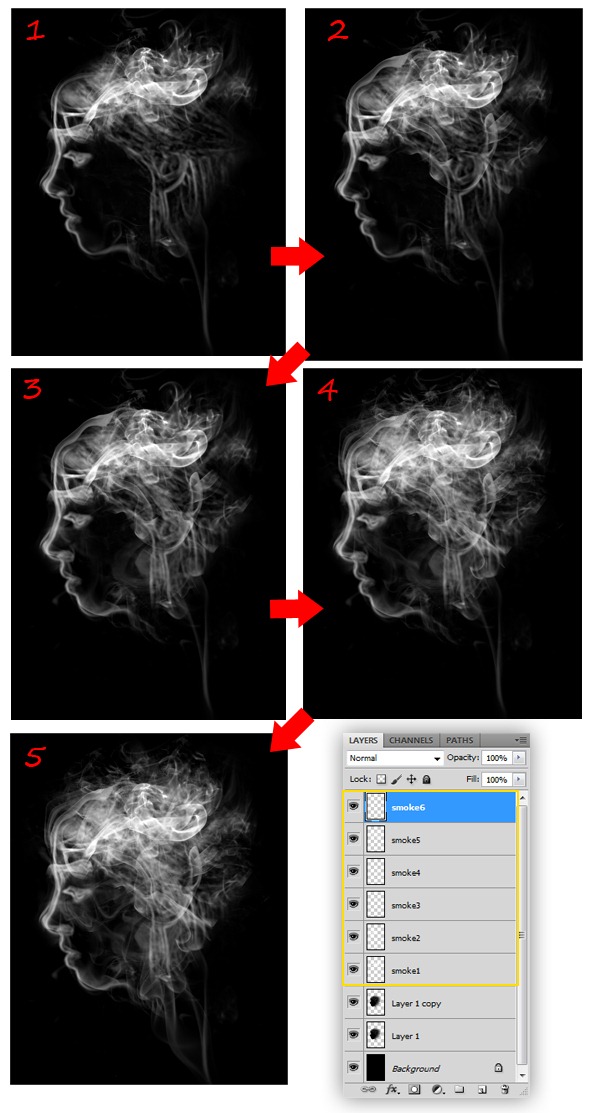
The key to getting the job done is patience. For a more convincing result, combine Option 2 (Liquify) and Option 1 (Smudge). Remember to create a new layer each time you add new smoke. You should start to get a good feel for this technique once you begin, so I will not go into further detail about this. Please see the illustrations below for a quick guide.
clip_image015

Step 5 - Adding Depth

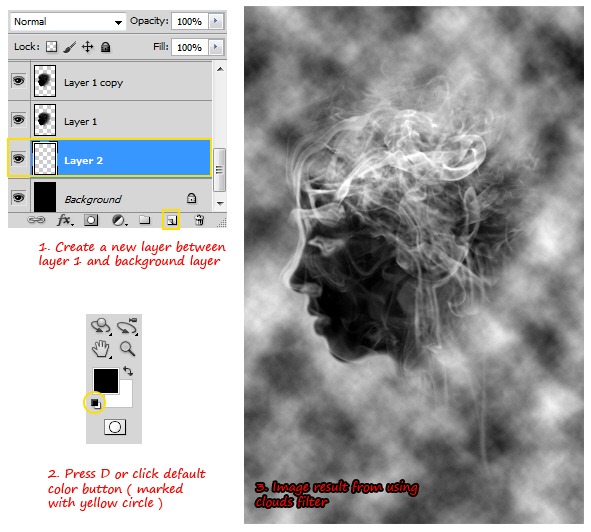
Create some depth in the illustration by adding extra fumes in the background. To do this, create a new layer between the Background Layer and Layer1. Set the Photoshop default color by pressing D (the foreground color should be set to black and the background color should be white). Go to Filter > Render > Clouds.
clip_image016

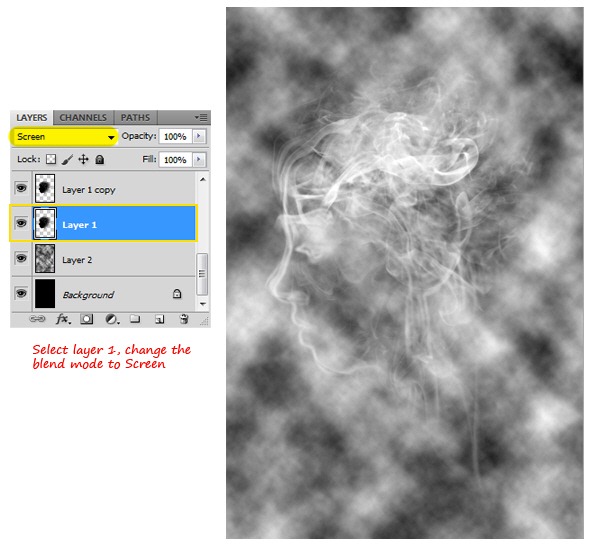
Notice how the black color of the head (Layer 1) is blocking the layers beneath it, which is not the effect we want to achieve. The clouds should be transparent so this will have to be adjusted. Go back to Layer 1 and change the blend mode to Screen. This should fix the problem.
clip_image017


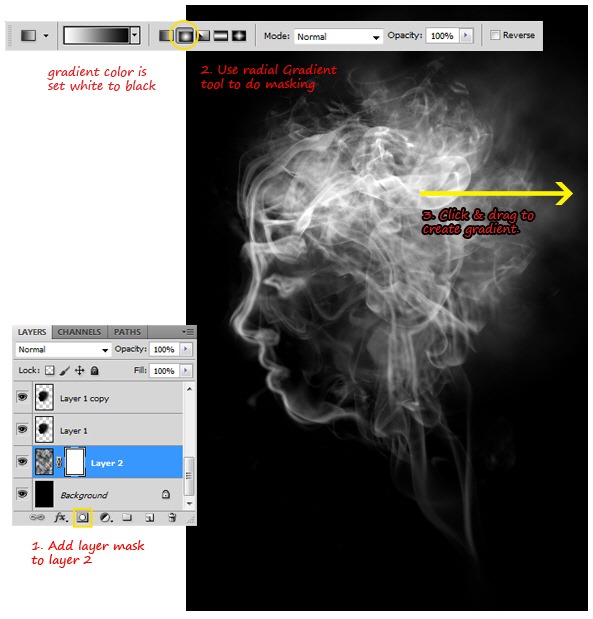
Go back to Layer 2 (the cloud/fume layers) and add a Layer Mask. Use the radial Gradient tool to do the masking so that the fumes look like they are fading, as shown in the example below. The smoke art is now complete. If you wish to add some glitter and editable color, keep on reading!
clip_image018

Step 6 - Adding Glitter and Color

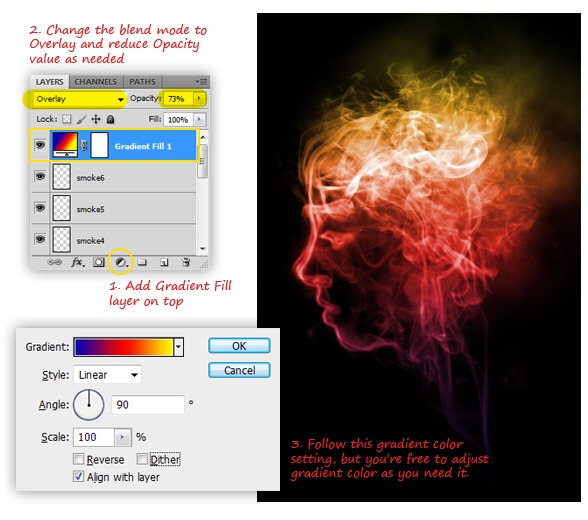
Add a new Gradient Fill layer above all the other layers. In the Gradient Fill dialog, adjust the gradient color, angle, etc. as shown below. Click OK to apply gradient color.
clip_image019

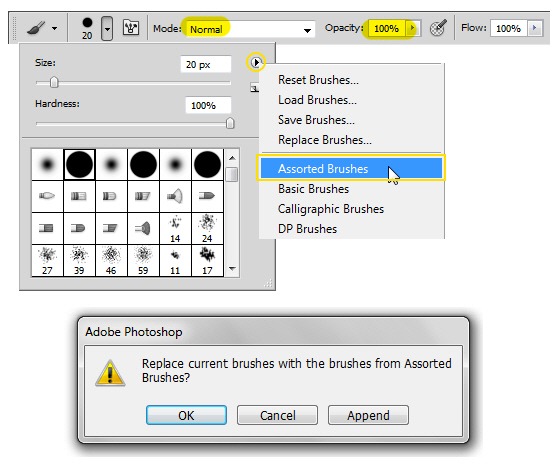
Using the Brush tool, click the menu button from the preset brush picker and choose Assorted Brushes. Photoshop will ask you to replace the current brush, choose Append. This will add the assorted brush to the list.
clip_image020

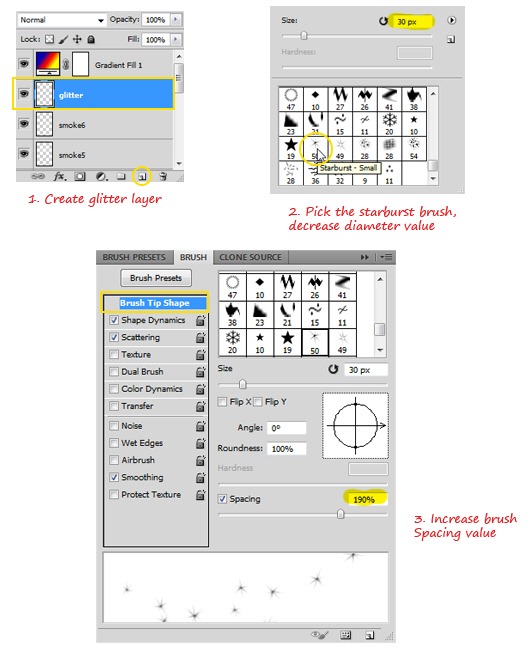
Create a new layer named Glitter and place it below the gradient layers. Still using the Brush tool, select the starburst brush and decrease the Diameter value to around 30px. Show the Brushes panel by pressing F5, and increase the brush spacing value to around 190%.
clip_image021

Select the Shape Dynamics option. Increase the Size Jitter and Angle Jitter values. Don't forget to check the Flip X and Y Jitter option. Now go to the Scattering option and increase the Scatter and Count values. Follow the images below for a quick guide to the settings.
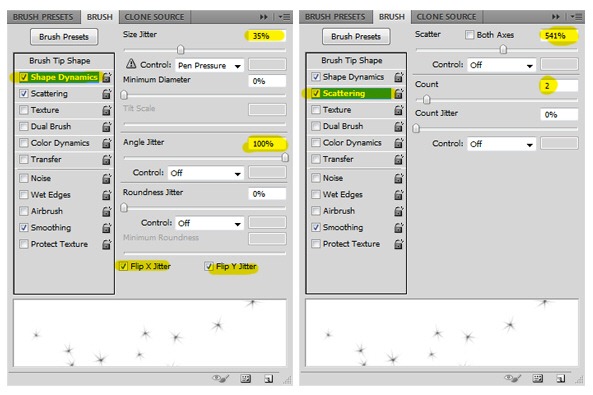
clip_image022

Use white as the brush color, and then draw a glitter effect as shown in the example below. Make sure you are still in the Glitter Layer before doing these steps.
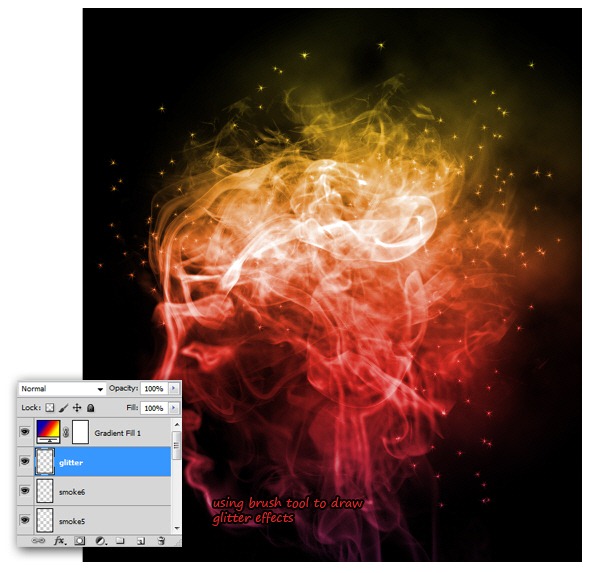
clip_image023

Make the glitter look blurrier. Select Filter > Blur > Gaussian blur with Radius 0.9px. In the final step, reduce the Glitter Layer’s opacity to 38% so it will look see through.
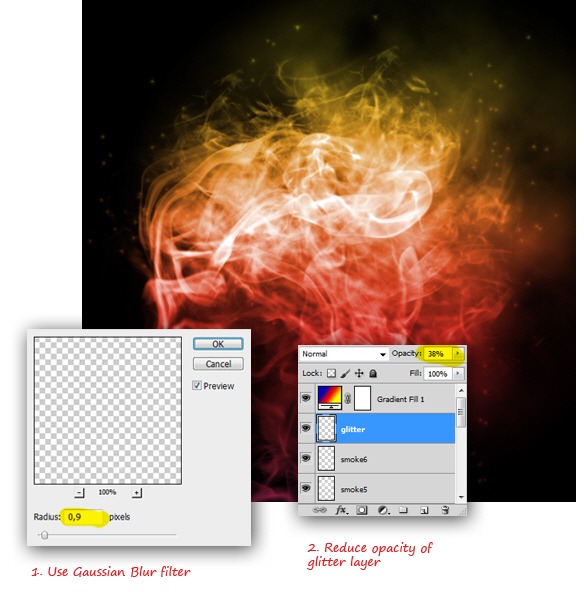
clip_image024

And we're done! Don't forget to save your work. I hope this tutorial is useful to you. Try using your own stock photo and see how well you do recreating this effect. Below are the final image and the same image with an alternate color scheme. Enjoy!

clip_image001[1]clip_image025

source:photoshoptutorials.ws
read more... R�sum�abuiyad

Elegant Typography on Vista Background

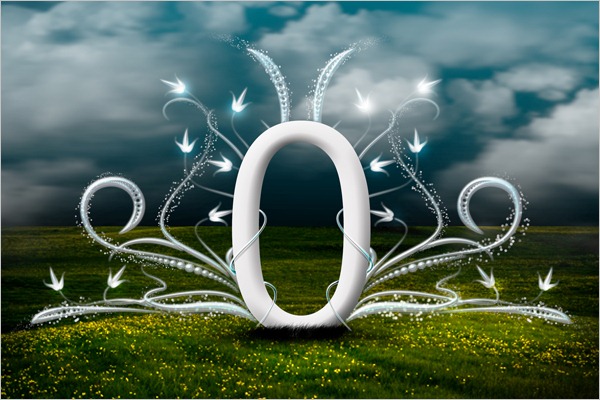
Find out how to create this elegant typography image with Photoshop! This tutorial will show you how to combine layer styles, Photoshop brushes, and stock photos to create this typography artwork.

Preview of the Final Result

Final-Design

Elegant Typography on Vista Background Photoshop Tutorial

IMPORTANT: Whenever you create an effect, use the action palette to store the functions so that it is easier for you to get the same effect when you need it again.

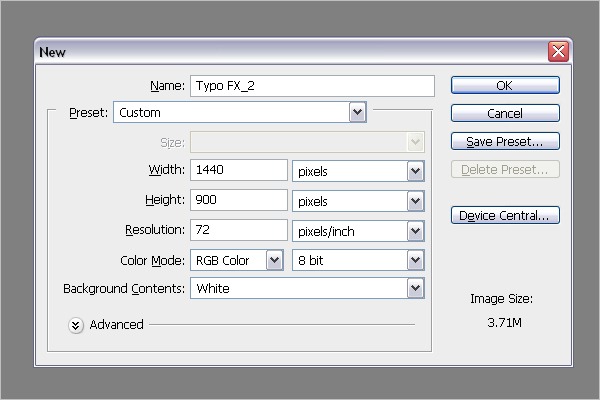
Step 1 - Create a New Document

Choose File > New (Ctrl/Command + N). This wallpaper size is 1440px (width) X 900px (height). You can use any wallpaper size that you wish.

Step-1

Step 2 - Background

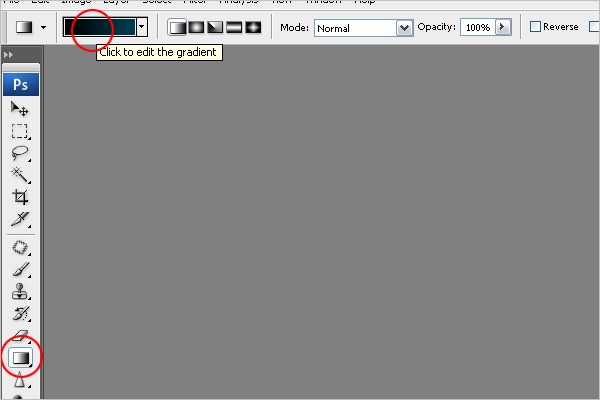
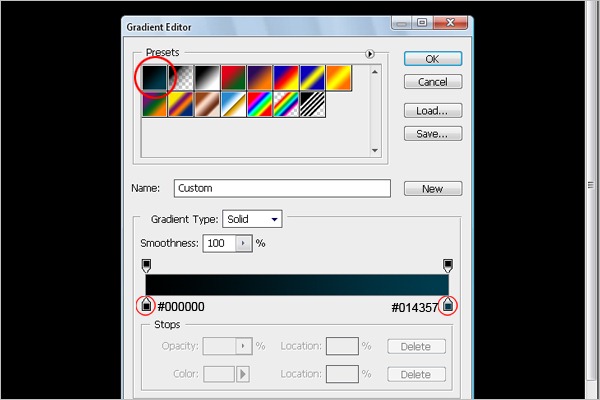
Use a gradient background, which will help in the upcoming steps to see how the image changes with each step. Select the gradient tool. Click on the Edit Gradient option in the left top corner.

Step-2

Step 3 - Changing the Color

Use

the two color option. Select the left side color option and change it to black (#000000), then select the right side option and make it blue (#014357).

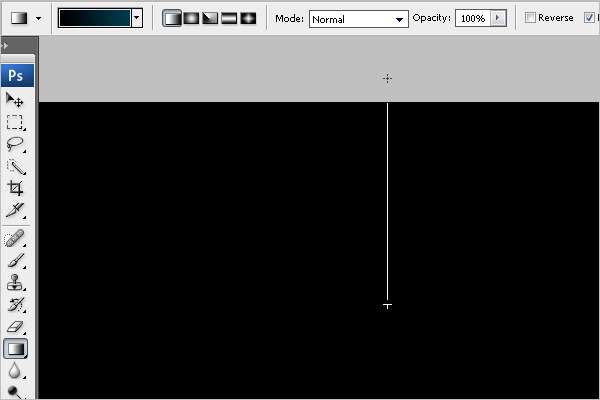
Again, use the gradient tool and drag it to the topside of the screen.

Step-3

Step-3(a)

Step-3(b)

Step 4 - Creating the Text

Type the text "0”. Select the font Arial > Font size = 1119pt. > Color = #dedcdc. You can decide which font size works best for you

Step-4

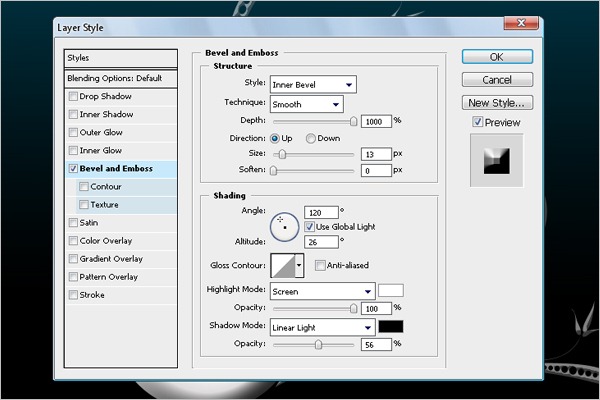
Step 5 - Adding Bevel and Emboss

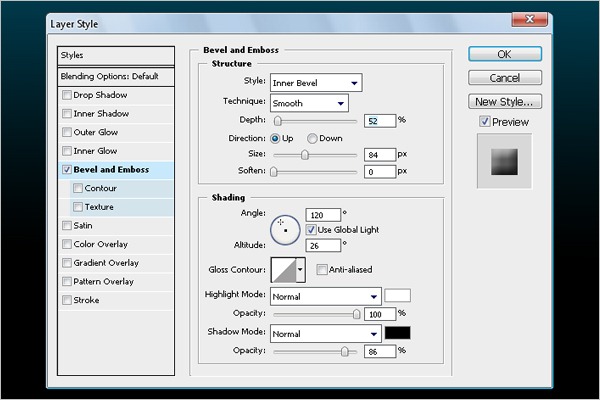
Add bevel and emboss effects to give some depth to the text.

Step-5

Step-5(a)


Step 6 – Download Floral Design

Add a floral design behind the text. This design gives a cool look to the text. You can get this design from this link:
http://myphotoshopbrushes.com/brushes/id/244

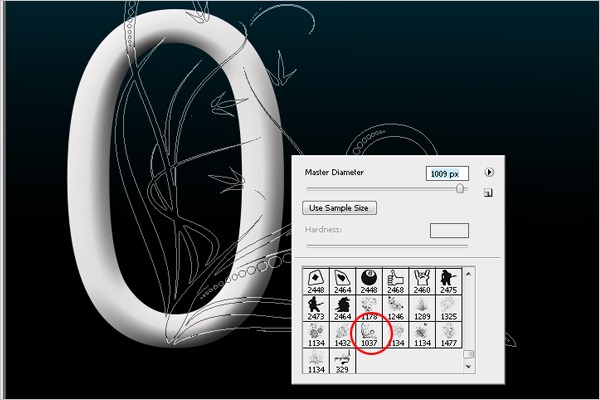
Once you have downloaded it, load the brush and choose the 1037 brush from the palette.

Step-6

Step 7 - Adding Floral Design

Select create a new layer and choose the color gray (#808789). Click on the screen to place the design. Make sure that the design is placed behind the text.

Step-7

Step 8 - Removing the Unwanted Design

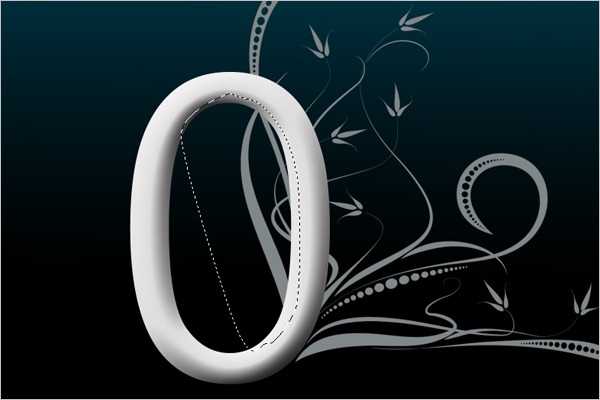
Erase the design that is inside the text.

Step-8

Step-8(a)

Step 9 - Adding Bevel and Emboss

Add bevel and emboss effects to give it a 3D feel.

Step-9

Step-9(a)

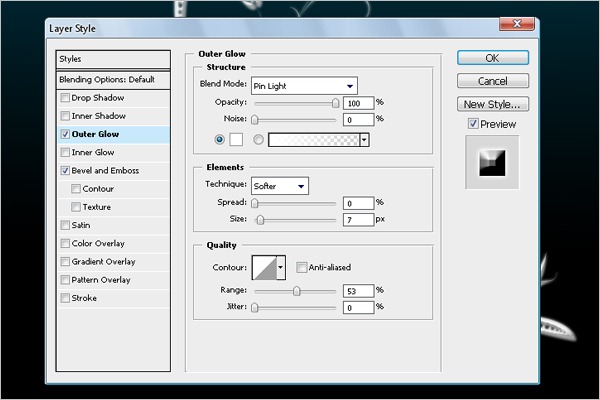
Step 10 - Adding Outer Glow

Add a glow effect to give a glossy feel to the design.

Step-10


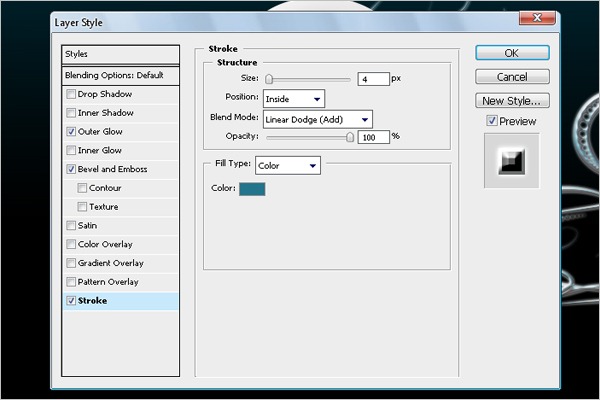
Step 11 - Adding Stroke

Add a stroke effect. This will help blend and finish off the edges of the design.

Follow the settings below and select the stroke color as blue (#23758c).

Step-11

Step-11(a)

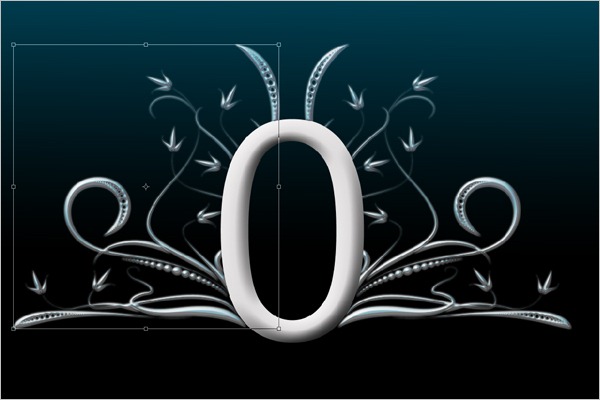
Step 12 – Duplicating the Design

Add the design to the opposite side of the text. Duplicate the same design on the left side of the text.

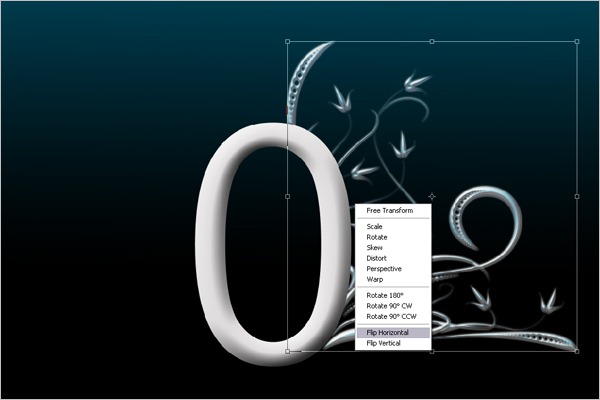
Click on the design layer and Press Ctrl + J to duplicate > Press Ctrl + T to transform > Right click on the screen and select Flip Horizontal > Once it’s flipped, move the design to the left side of the text as shown in the final image below.

Step-12

Step-12(a)

Step 13 - Adding Glow Effect

Add a light effect to the design to make the flowers glow.

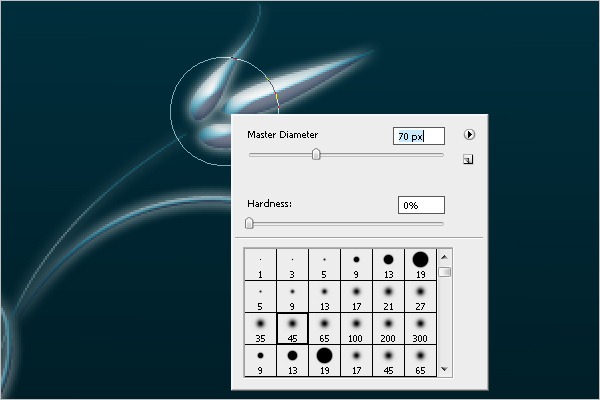
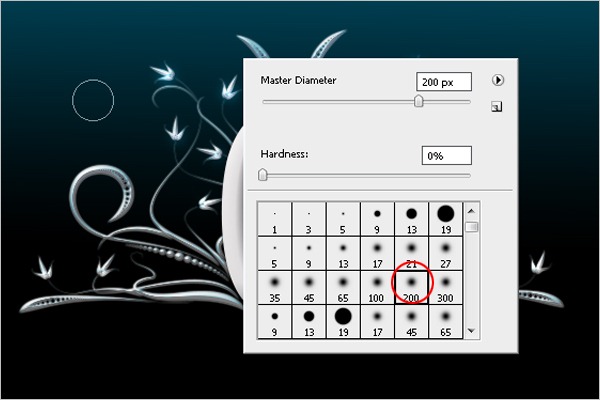
Select brush tool (B) > Right click on the screen and choose soft round 45px brush > Make the brush diameter 70px

Step-13

Step 14 - Adding Glow Effect

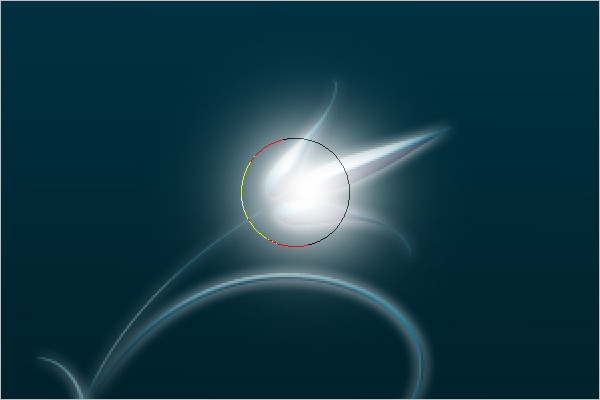
Once you select the brush, make sure that your foreground color is white. Create a new layer and click on the design.

Step-14

Step 15 - Blending Glow Effect

Blend the glow effect with the design to create a glowing feel. Select the brush layer and choose the blending mode as "Overlay".

Step-15

Step 16 - Duplicating the Glow Effect

Add the glow effect to the entire flower design.

Step-16

Final

Step-16(a)


Step 17 - Creating a Light Glossy Shade

Create a glossy shade above the design to give a glowing effect to the entire image.

Create a new layer and move it to the top of all the other layers > Choose the brush shown below.

Step-17

Step 18 - Creating a Path

Create a path using the pen tool (P).

Step-18

Step 19 - Selecting a Stroke Path

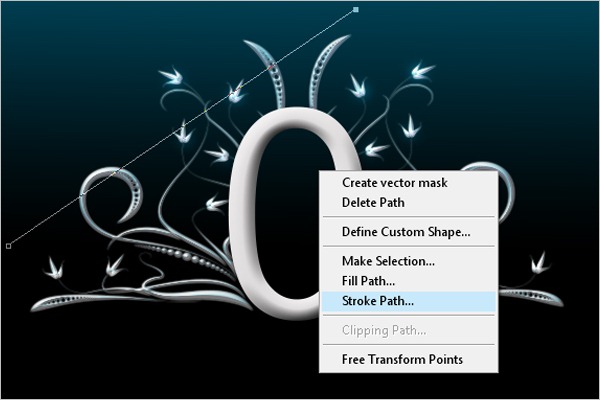
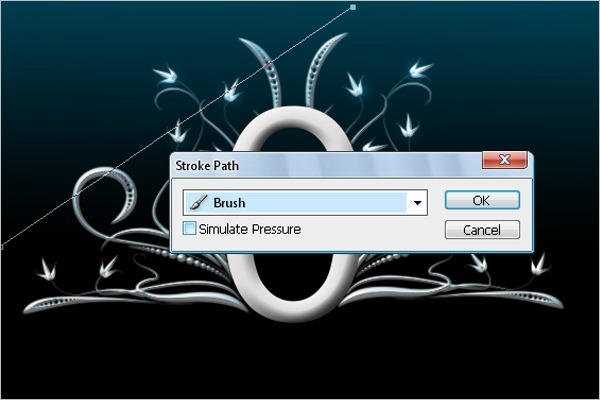
Right click on the screen and select a stroke path.

Step-19

Step 20 - Filling the Stroke Path

Once you select the stroke path, you will get a stroke path option. Select Brush from the option and click OK.

Step-20

Final

Step-20(a)

Step 21 - Duplicating the Stroke Path

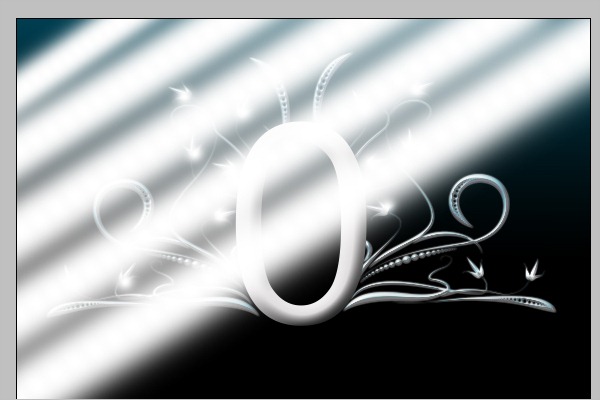
Once you are done with the stroke path, duplicate the path into multiple copies. Select the stroke layer > Press Alt + Click and drag in the same direction multiple times.

Step-21

Step 22 - Blending the Stroke Fill

Transform the stroke fill to the entire screen. Select the blending mode from the layer palette as "soft light".

Step-22

Step 23 - Adding Gaussian Blur

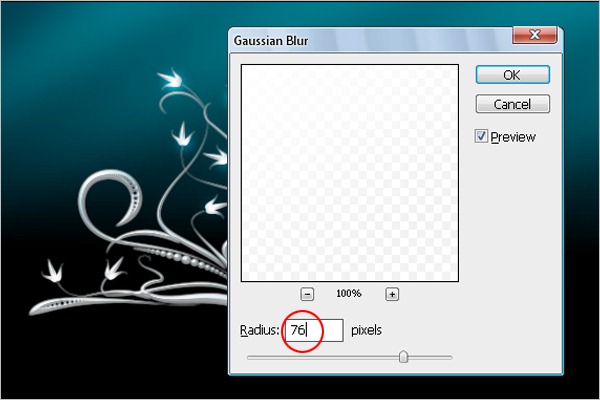
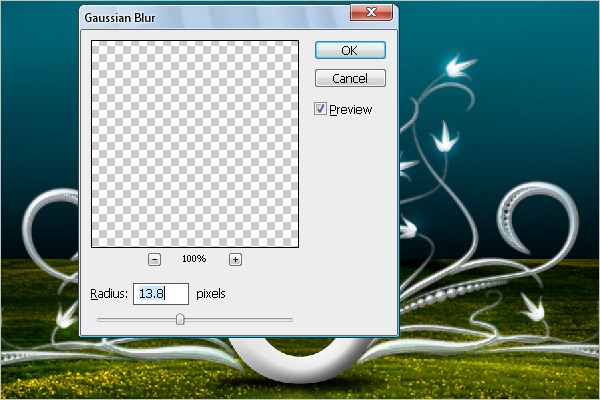
Make the stroke fill a little bit smoother. Select Menu > Filter > Blur > Gaussian Blur > Follow the settings below.

Step-23

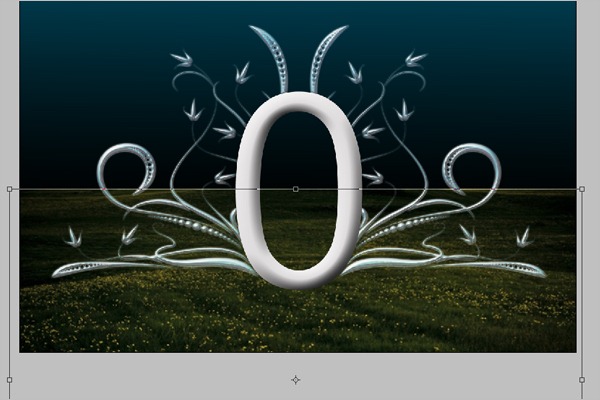
Step 24 - Adding Landscape

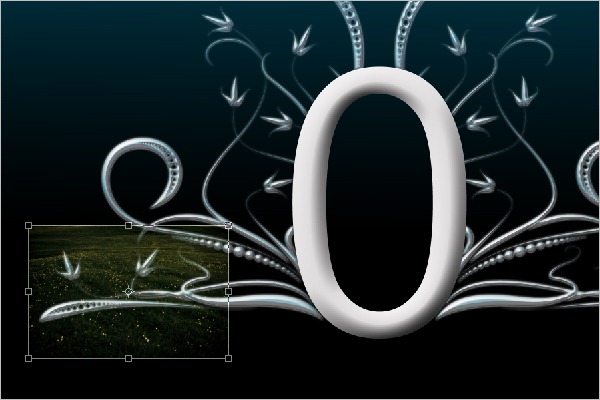
Add a landscape to the typo design. You can download the image here:

Once you download the image, insert it on the screen and press Ctrl + T to make it transform. Make sure that this image layer is at the bottom of all the other layers.

Step-24


Step 25 - Transforming the Image

Select the transform tool, then click and drag it to the entire screen as shown below.

Step-25

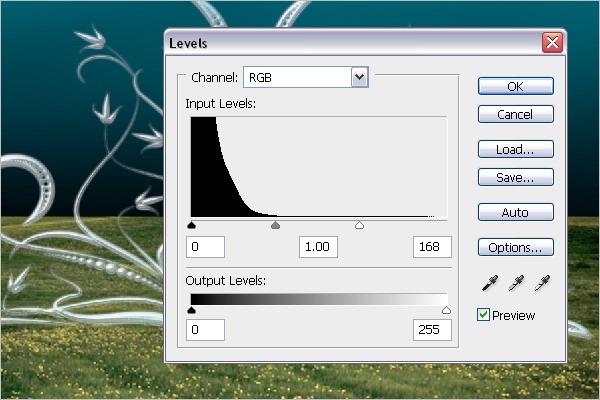
Step 26 - Adding Levels

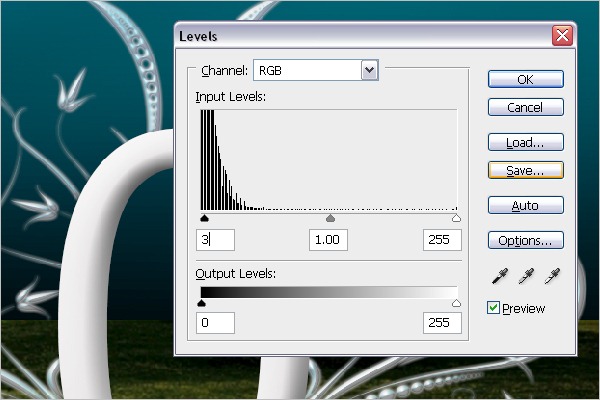
Do some color setting to the image to add levels. Press Ctrl + L and follow the settings below.

Step-26

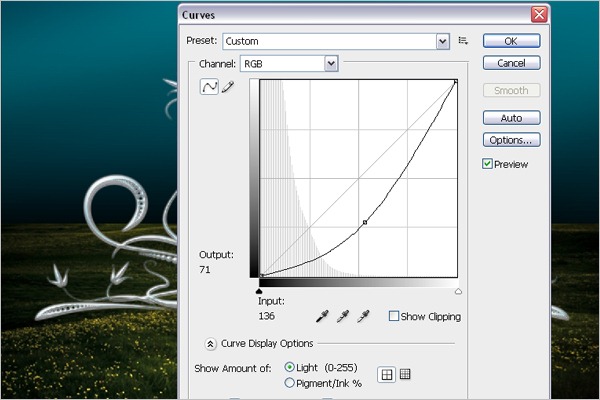
Step 27 - Creating Curves

Make the image dark enough so that when we add light, it gives off more of a glowing effect.

Step-27

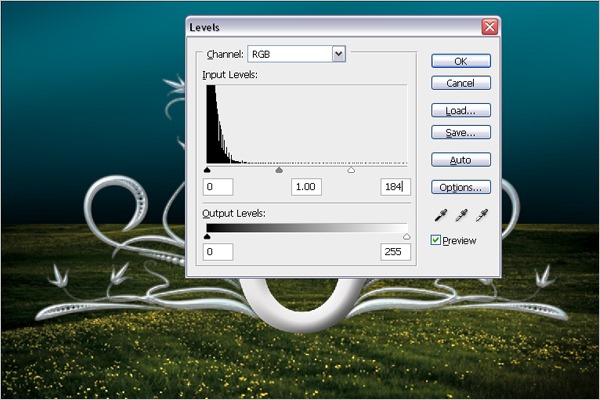
Step 28 - Adding Levels

Add levels to the image to make it a little bit lighter.

Step-28

Step 29 - Creating a Path

Create a glowing reflection effect by creating a path. Select the pen tool (P) as shown below.

Step-29

Step 30 - Filling the Path

Fill the path. Press Ctrl + Enter > Choose the foreground color as white > Press Ctrl + Backspace.

Step-30

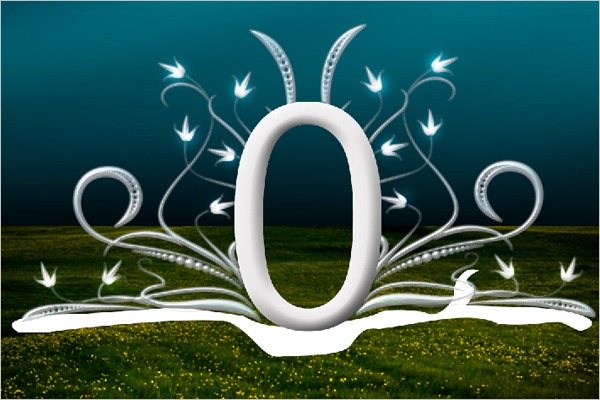
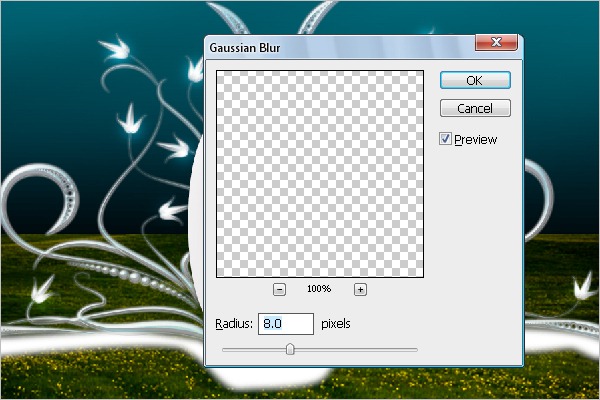
Step 31 - Adding Blur

Make the shape a little bit smoother by adding a glow effect. Select Menu > Filter > Blur > Gaussian Blur > Follow the settings below.

Step-31


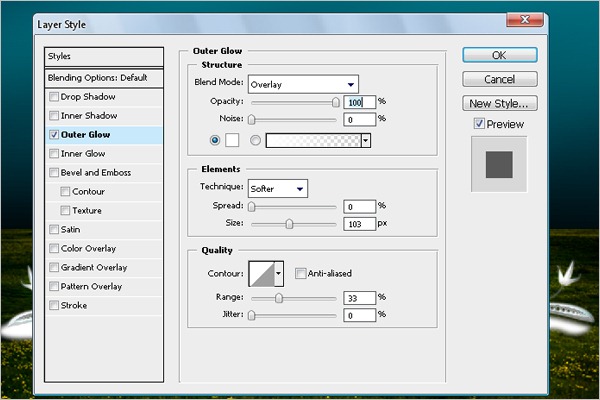
Step 32 - Creating Outer Glow

Add a glow effect to give a glossy feel to the shape. Set the outer glow settings as shown below. Go to Layer Blending mode > Choose Overlay.

Step-32

Step-32(a)

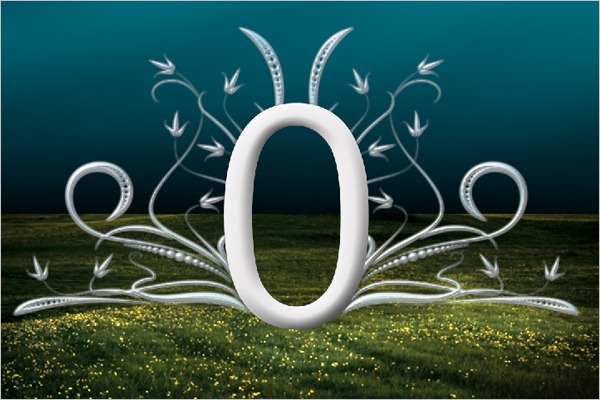
Step 33 - Adding Levels

Add a little bit of level to make the glow stand out more.

Step-33

Step 34 - Adding Shadow

Add a cool shadow to the text. Select the Ellipse Tool (U) from Tools and create a shape path as shown below. Next, fill it in with black color.

Step-34

Step-34(a)

Step 35 - Adding Gaussian Blur

Make the shape smooth so that it flows to all the areas around the text.

Step-35

Step-35(a)

Step 36 - Adding Grass

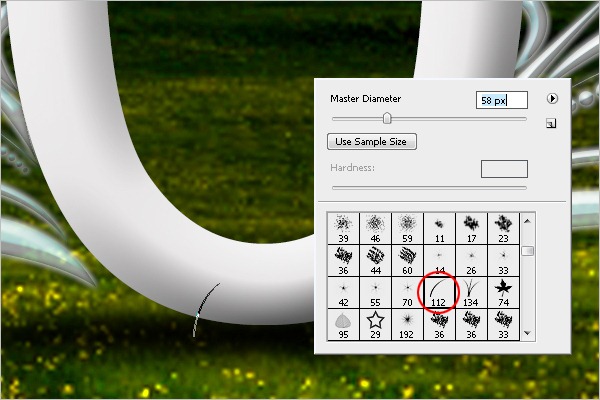
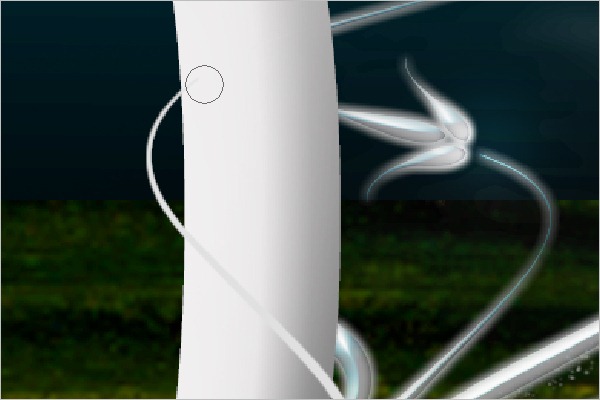
Add some grass above the text to get the feeling that the text is placed on land.

Select the Brush Tool (B) > Right click on the screen and select Dune Grass. Once you’re done with the settings, click on the shadowed area to place the grass.

Step-36

Step-36(a)


Step 37 - Adding Clouds

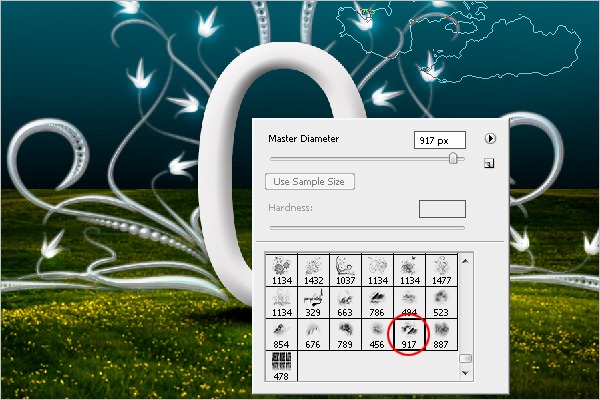
Create clouds to get a real landscape feel. Download the brush from this link: http://getbrushes.com/weather-photoshop-brushes/javierzhx-cloud-brushes.php

Load the brush and select the 917 cloud brush. Create a new layer and place the brush on the image. Make the brush big enough so that it covers half the screen. Duplicate the cloud you just created and place it on the other side, or make a new cloud brush and place it as you wish.

Step-37

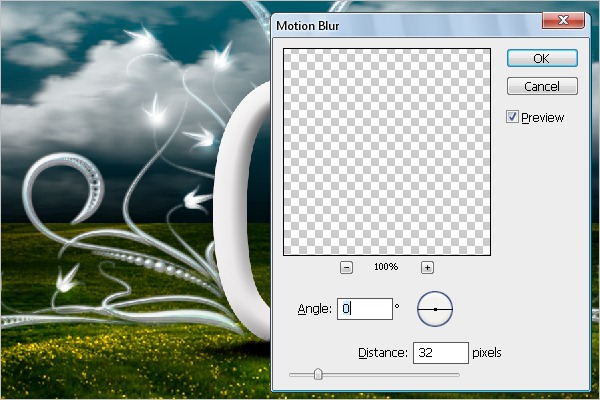
Step 38 - Adding Motion Effect

Add a motion effect to the clouds. Select Menu > Filter > Blur > Motion Blur > Follow the settings below.

Step-38

Step 39 - Adjustment of Clouds

Adjust the clouds according to the space. Fill in the blank areas with clouds.

Step-39

Step-39(a)

Step 40 - Creating a Path

Create a path for the particles to flow along it. Select the pen tool (P) > Create a path like the one below.

Step-40

Step 41 - Adding Particles

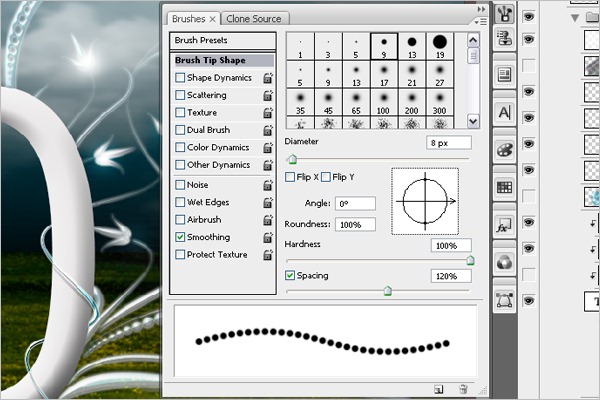
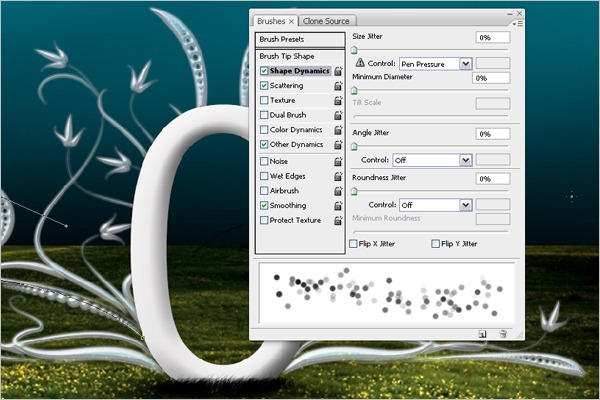
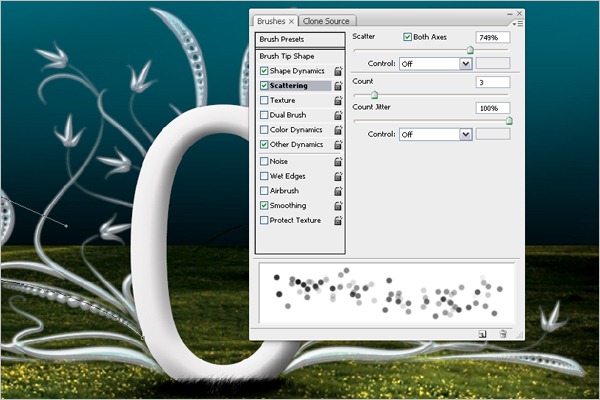
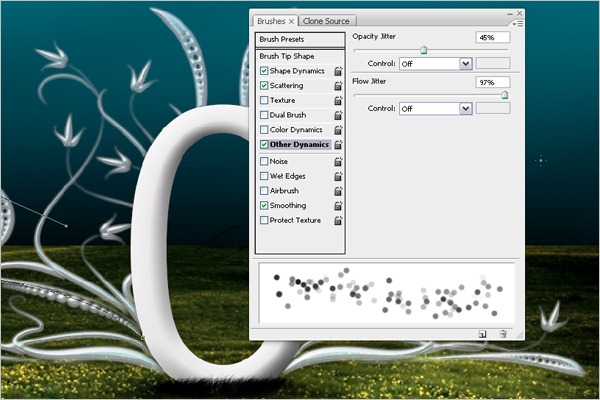
Select the brush settings before filling it with the particles. Select Menu > Window > Brushes Palette > Follow the settings below.

Step-41(c)

Step-41
Shape Dynamics

Step-41(a)
Scattering

Step-41(b)
Other Dynamics


Step 42 - Filling Particles

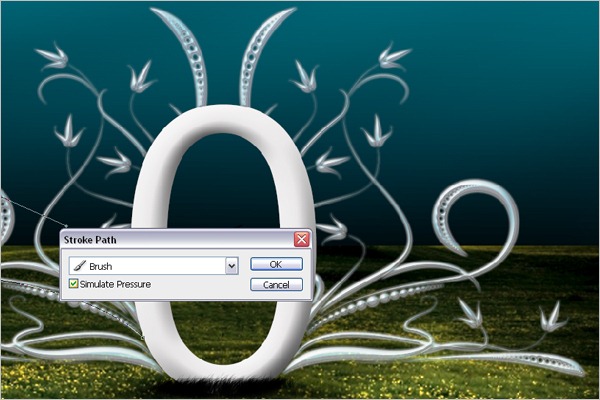
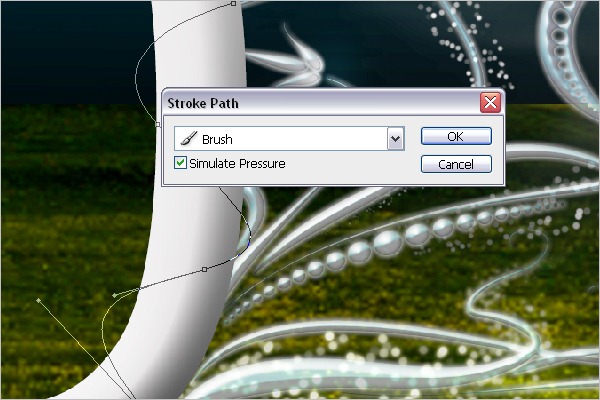
Once you are done with the settings, select the pen tool (P) > Right click on the screen and select Stroke Path > Select brush and activate "Simulate Pressure" to give smooth edges.

Step-42

Step-43

Step 43 - Multiplying the Particles

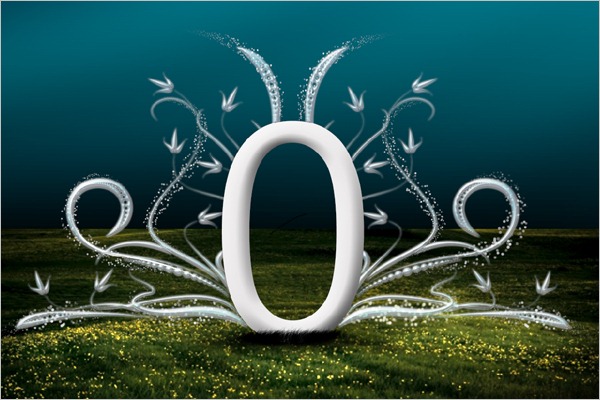
Follow the same instructions in Step 42 to create the particles for the entire design.

Step-43(a)

Step 44 - Finishing Touches

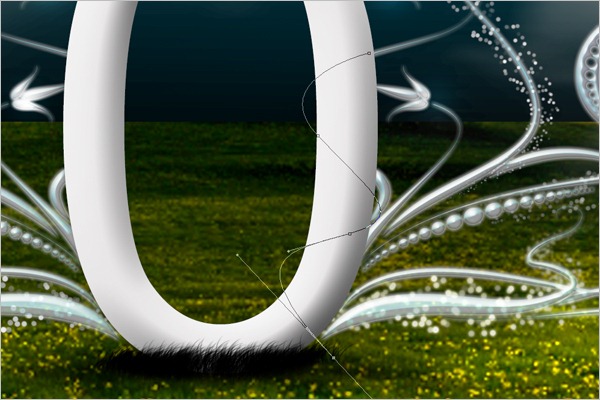
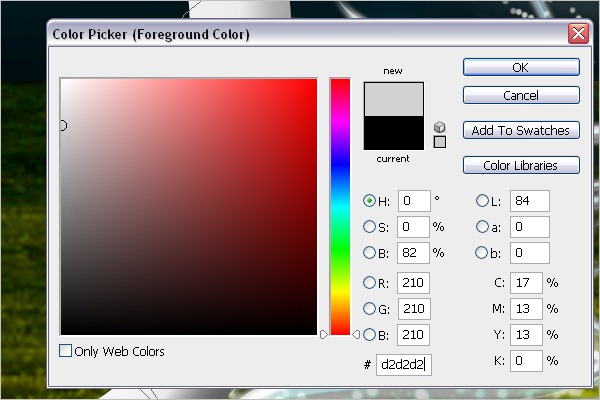
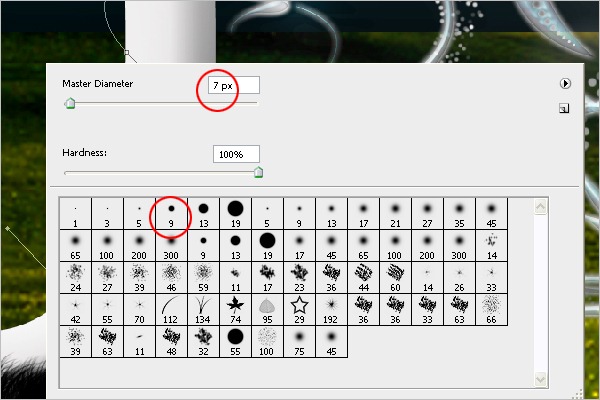
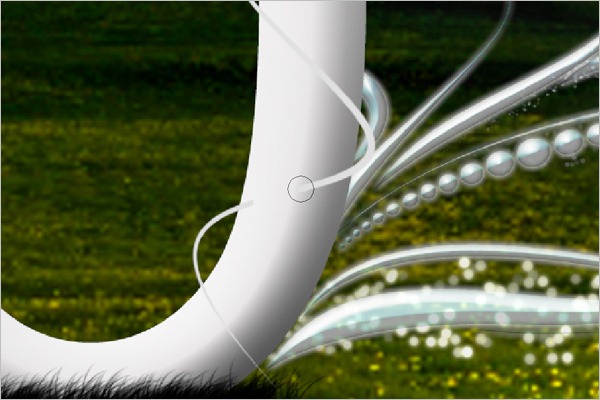
Select the pen tool (P) > Create a curve path as shown below > Select the foreground as a gray color (#d2d2d2) > Select the brush (B) > Right click on the screen > Choose hard round brush 9px > Brush size = 7px or 8px > Choose pen tool (P) > Right click on the screen > Choose Stroke Path > Select brush and activate "Simulate Pressure" to give smooth edges.

Step-44

Step-44(a)

Step-44(b)

Step-44(c)

Step 45 - Erasing the Curve

Erase the curve to create a 2D view. Choose the Eraser tool (E) > Right click on the screen > Choose hard round brush 9px. Start erasing the top

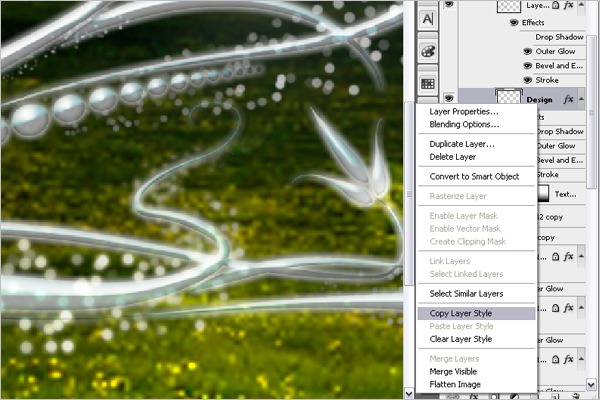
and bottom shapes. Next, create the same effect that you did to the floral design. Select the floral design layer > Right click the layer > Choose copy layer style. Now Select the current curve layer > Right click the layer > Choose past layer style. Once you select the layer and duplicate it, flip it to left side of the text.

Step-45

Step-45(a)

Step-45(b)

Step-46

Step 46 - Add Shadow to the Curve

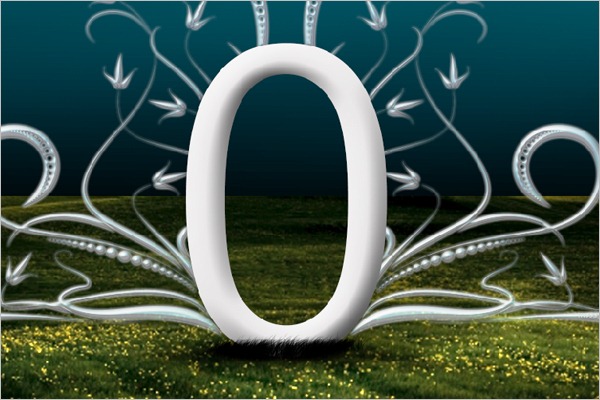
Finally, add shadow to the curve. Select the curve layer and duplicate both the layers > Remove the layer style > Fill the shape with gray > Bring the layer 3px down. Your shadow is ready. Your final image will look like this:

Final-Design[7]

Final Results

Final-Design[7]

Another version

source:/photoshoptutorials.ws
read more... R�sum�abuiyad