Pages

Wednesday, August 4, 2010

Lady Rocker Wallpaper

In this tutorial, we'll making an photo effects inspired by rock ‘n’ roll music called "Red Lady Rocker". Some tricks you going to learn is about tricky hair selection, creating and using custom brush, creating pattern, using layer blend mode and layers style for eye candy result and many more!

wallpaper

Lady Rocker Wallpaper Photoshop Tutorial

  • Program: Adobe Photoshop CS or newer version
  • Difficulty: Medium
  • Estimated Completion Time: 1 to 2 hours

Resource:

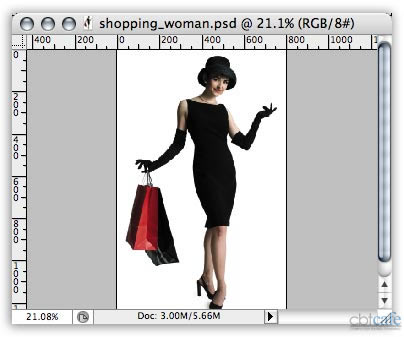
Step 1 – Extracting the Model

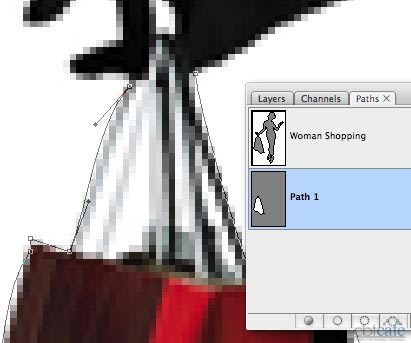
Open the stock model image then extract this model using combination of selection path and quick mask. However, if you already familiar with this kind of selection, you can jump to step 2. First, use Pen tool then make sure shape layers is ON and Exclude Overlapping Shape area option is selected. Create selection paths around model's body. I encourage you to zoom in ( around 200% ) when doing this, so you can get more detailed selection paths.

Note: this stock is belongs to Janet Goulden, do not redistribute or sell this image without permission! thanks :)

01

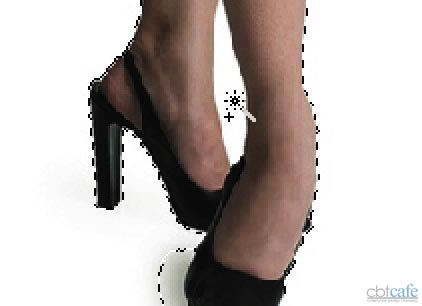
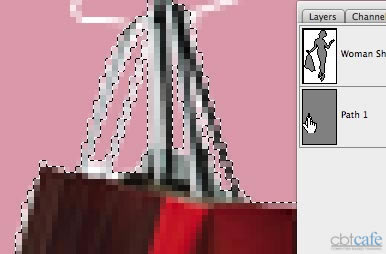
When you're done selecting, right-click using Pen tool to show popup menu. Choose Make Selection then click OK on the make selection dialog box appear next. After the selection marquee appear, click Quick Mask button in the toolbar to change editing mode to Quick Mask ( you can simply press Q on your keyboard to change editing mode from normal to quick mask mode ).

02

In Quick Mask mode, unselected area is highlighted with red. Use soft round Smudge tool with Strength: 30% to soften edges of hair selection.

03

Click Edit in normal mode button ( or simply press Q again ), now with the selection marquee visible again, press Ctrl+J to duplicate selected model on a new layer. Rename this layer, "lady".

04

Step 2 - Creating Flowery Pattern for Background

We need bigger space for background, so get the Crop tool and create extended selection like this one below. When done selecting, hit Enter to extend your canvas.

05

Use radial Gradient tool with combination color of light and darker red ( you can see the RGB color code in the screenshot below ). Make sure you have selected the background layer then draw the gradient.

06

Create new document ( press Ctrl+N ), adjust width and height value to 372x569 px then make sure to select white as background color. Click Ok. Now use Brush tool and load textile pattern brush. If you don’t know how to load brush, see explanation in the screenshot below.

07

After loading the custom brush, you can now pick one of the brush. In this case, I used the ornament_texture2 brush. Select pink/magenta as the brush color's, then click on the newly created document to make the pattern ( just one click ).

08

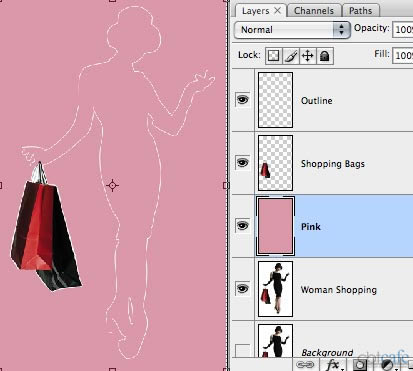
Save this document as a pattern by going to Edit > Define Pattern menu. Give it a proper name (mine is flowery) then back to lady rocker document and create a new layer between background and lady layer's.

09

With the flowery layer's selected, go to Edit > Fill menu (or simply press Shift+F5). In the Fill dialog, use Pattern as fill then select the flowery pattern. Make sure Opacity is set 100%, and now you can click OK. *Tadaa*.. your background now covered with flowery pattern!

10

On the flowery layer, change the blend mode to Multiply then lower the opacity to 50%. The pattern should blend nicely with the gradient now.

11


Step 3 - Motion Blur Effect

Duplicate lady layer. Rename the layer to lady 2 then change its Blend Mode to Screen. Now hit Ctrl+T to call the free transform command then skew the duplicated lady to left. Hit Enter to apply transformation.

12

Use soft round Eraser tool to erase some parts of the image (marked with yellow strokes in the screenshot below).

13

Duplicate lady layer's once again. This time, drag the duplicated layer below the original lady layer's. Rename it to lady 3 then change its Blend Mode to Screen. Hit Ctrl+T, then skew this image to right. When done, hit Enter to apply the transformation.

14

Erase some parts of the image (marked with yellow strokes) using soft round Eraser tool again.

15

Still on the same layer, go to Filter > Blur > Radial Blur. Adjust Amount value around 5 to 10 (mine is 8)then click OK. We're done here, next to creating the color flow brush.

16

Step 4 - Drawing Color Flow Brush

Create a new document with 1500x300 px wide. Use Rectangle tool with Shape Layers ON to draw a black, long rectangle.

17

Add Gradient Overlay layer style to the shape layer's. Use Reflected Style and increase the Scale to 150%. For the gradient color, we're using combination of grey and black (the RGB color code can be seen in the screenshot below).

18

Still on the same layer, add Drop Shadow layer style. Set 0 for Distance and Spread, then increase Size to 10px. The drop shadow is subtle, but it's there.

19

Now we need to skew this rectangle. Go to Edit > Transform > Skew to do this work (make sure you drag on one of the highlighted control points). Hit Enter to apply skew transformation. Go to Edit > Define Brush Preset menu to save this document as a new brush preset. Name this new brush as you like (mine is grey flow).

20


Step 5 - Adjust Brush Setting for Color Flow Brush Effect

Back to lady rocker window, create a new layer called color flow. Make sure you place it on top of all layer. Activate Brush tool and see the brush preset picker. You should see now the grey flow brush is in the bottom list. Select the grey flow brush.

21

Hit F5 to show the Brushes panel. In the Brush Tip Shape section, increase Spacing to 500% and reduce diameter to 500px.

22

Click on Shape dynamics, maximize Size Jitter value to 100% and Increase minimum diameter to 50%.

23

Now go to Scattering section, increase Scatter value to 150% and Count to 2. Make sure the Both Axes option is checked.

24

You may want to save this setting as Brush preset, so you can call this setting anytime you need it. Click on the tool preset picker, usually the Current tool only is checked so you can only see the list of preset for the current active tool. Now click on the new tool preset button, name this preset as you like and uncheck Include color option. Click OK to save the preset.

25

Step 6 - Creating Color Flow Effect

Select pink/magenta as your brush color, then drag horizontally to draw the color flow effect.

26

Continue creating color flow effect using combination of different colors. As you can see here, I'm using blue, green, yellow and purple.

27

Duplicate color flow layer's twice, so you need to press Ctrl+J as much as twice. Rename the layers to color flow 2 and color flow 3. When you finish renaming, drag down two color flow layers as you can see in the screenshot below.

28

Click off color flow 3 layer visible button to hide it. Change color flow layer blend mode to Luminosity. Select color flow 2 layer, change blend mode to Color Dodge and reduce the opacity to 55%. You may get confused by this (I hope you don't), so make sure you follow the screenshot below correctly.

29

Still in the same layer, go to Filter > Blur > Motion Blur menu. Set Angle to 0 and Distance: 500 px. Click OK to apply the motion blur filter.

30

Unhide color flow 3 layer, then press Ctrl+T to call free transform command. Rotate the color flow so it appears diagonally. Hit Enter to apply rotation.

31

Now go to Edit > Transform > Warp. Manipulate the shape of color flow using warp control point, just follow the yellow arrow in the screenshot below.

32

Duplicate color flow layer (press Ctrl+J), then rename it and change its blend mode to Color Dodge. Go back and select color flow 3 layer, now change its blend mode to Linear Dodge (Add).

33

Still in the same layer, go to Filter > Blur > Motion Blur menu. Set Angle to 45 degree and Distance: 500px. Click OK to apply motion blur filter.

34


Step 7 - Adding Sparkle and Glowing Brush

This step will teach you how to create the sparkle brush, first you need to create new layer on the very top layer. Name it sparkle and select blend mode: Overlay, this is the layer we'll use to draw the sparkle effect. Pick soft round Brush tool (I picked 19px) then hit F5 to show the brushes panel. In Brush Tip Shape section, increase Spacing to 196%.

35

Click on Shape Dynamics, set Size Jitter: 100% and Minimum Diameter: 0%. Click on Scattering, increase Scatter to maximum ( 1000% ). Set Count: 1 and Count Jitter: 100%. Before you use the sparkle brush, you may want to save it as a tool preset just like the previous grey flow brush.

36

Make sure you're on sparkle layer and white is selected as brush color. Now start creating sparkle effect with the sparkle brush.

37

Using Horizontal Type tool, add white colored text "ladyrocker". You can use whatever font you like, my font name is Fusion with 20pt size. Add Outer Glow layer style to the text layer and increase the glow Size to 49 px or higher.

38

Create another new layer on top. Use Brush tool to load another custom brush which is named random vector brush. As you can see below, I've highlighted three brush shape we are going to use.

39

Grab wing brushes from the brush preset picker (highlighted in the previous screenshot step). And the last is add a Outer Glow layer style to the new layer so the wings will appears glowing. And now you're done! don't forget to Save your work :) I think this is fun, and i hope you can learn something new here. Next time, try with your own stock.

40

Final Results

preview_small

SOURCE::photoshoptutorials.ws/photoshop-tutorials/photo-manipulation/lady-rocker-wallpaper/all-pages.html

read more... R�sum�abuiyad

Threshold & Blend Mode Design

Version: Photoshop CS3
Level: Easy
Objectives: Learn to use Threshold and Blend Modes to create special effects
Tools & Techniques: Threshold Command, Adjustment Layers, Gradient Fill, Blending Modes

QuickTime Video| Flash Video

Photoshop's Threshold command converts colors to either black or white. Blending Modes offer endless opportunities for creating special effects in Photoshop.

In this tutorial we'll take a look at combining the Threshold command to create a high-contrast, black-and-white image with blending to highlight specific colors in our image.

Photoshop CS3: Threshold & Blend Mode Design

We'll experiment with several blending modes but in the end you'll want to determine which effect is right for your image.

Step 1: Getting Started - Threshold

Go ahead and select an image to work with in Photoshop.

Starting Image

  1. Open an image in Photoshop
  2. Create a new Threshold Adjustment Layer by doing one of the following:
  3. The Threshold dialog box opens. Click and drag the slider to adjust the amount of black and white for your image.

Photoshop Threshold Command

Step 2: Applying a Gradient Fill

We just stripped out the color by applying the Threshold command. Now, let's bring it back in the form of a Gradient fill Adjustment Layer.

  1. Create a new Gradient Fill Adjustment Layer by clicking the New Fill/Adjustment Layer button and selecting Gradient... in the Layers palette. The Gradient Fill dialog window opens.
  2. Click the Gradient swatch to edit the gradient
  3. Select a preset gradient and click OK. This fills the adjustment layer with the gradient and covers the image below.

Step 3: Selecting a Blending Mode

The next step brings this all togwether. There are multiple blending options that will work with this effect. As always be sure to experiment.

  1. Click the Adjustment Layer with the gradient fill (should be your top layer)
  2. Click the Blending Mode menu and select one of the options. For this effect, try selecting one of the following:
    • Darken
    • Multiply
    • Linear Burn
    • Darker Color (CS3 only)
    • Lighten
    • Screen
    • Linear Color
    • Lighter Color (CS3 only)
    • Pin Light

Blending Mode: Pin Light

Blending Mode: Screen

Blending Mode: Multiply

Blending Mode: Multiply

Blending Mode: Pin Light

Blending Mode: Pin Light

SOURCE::http://www.cbtcafe.com/photoshop/threshold_effect/index.html

read more... R�sum�abuiyad

Silhouette Fashion Design Effect

Version: Photoshop CS3
Level: Moderate
Objectives: Learn to trace and select objects in Photoshop to create trendy illustration effects.
Tools & Techniques: Paths, selections, copying selections, saving selections, duplicating objects, adjustment layers, clipping masks, type

QuickTime Video| Flash Video

This Photoshop tutorial highlights some creative uses for Photoshop's selection tools to create a trendy illustration effect.

Silhouette Design - Final

The first step will be to select an image and create a selection path around it. There are several ways we can do about it for this lesson.

The quality of our Photoshop selection in this example is less important because we only want an outline.

Step 1: Getting Started - Removing Image from Background

For this example, we're using an image of a woman over a white background so we can use the Magic Wand to make a quick selection. Because we're creating an outline, we aren't as concerned with a high degree of accuracy and quality. The Magic Wand will work great.

Starting Image

  1. Open an image in Photoshop
  2. Duplicate the layer by selecting Background layer and then clicking Cmd-J/Ctrl-J. This puts the Background layer on a new layer named Layer 1.
  3. Rename the layer by double-clicking it. I called it "Woman Shopping".
  4. Select the Magic Wand with a moderate tolerance (25 should be fine)
  5. Click once anywhere in the white area of the image
  6. Add to the selection by holding the Shift key and clicking in the white area between her feet. (Your image may not have additional white spaces in which case your initial selection with the Magic Wand tool will be sufficient.)

Adding to Selection

Step 2: Converting the Selection to a Work Path

Now that you have an active selection around your subject, it's time to convert that selection to a work path.

  1. Select your Paths palette
  2. Create the work path by Alt-clicking/Option-clicking the Make work path from selection button
  3. Set the Tolerance to 1.0 and click OK
  4. Rename the work path by double-clicking the thumbnail. This will save the selection with the file.

Step 3: Creating the Outline Stroke

This next step creates the white outline around the woman. This stroke selection will the main effect for our image.

  1. Create an active selection by Cmd-clicking/Ctrl-clicking the Paths thumbnail
  2. Create a New Layer and name it "Outline". The white stroke will go on its own layer.
  3. Create the outline by going to Edit > Stroke... and enter a Width=1 and Color=white
  4. Deselect by clicking Cmd-d/Ctrl-D

It's a little hard to appreciate the white stroke at this point so let's take a moment and create a new solid colored layer.

Step 4: Adding a New Background Color Layer

  1. Create a New Layer between the Background and Woman Shopping layers. I named mine "Pink".
  2. Select a background color from the Background color picker. I used: #e3a8b5
  3. Fill the Pink layer with the selected background color by clicking Cmd-Delete/Control-Delete

White Stroke Over Pink Background

Step 5: Selecting the Dress and Shopping Bags

Our effect is only half complete. To complete the effect we need to create selections around parts of the image that will remain visible along with the stroke outline. In this example we want the dress and the bags.

We're going to cheat a little here. Rather than creating a new work path around both the bags and the dress, we'll work with the existing path and copy most of the existing selections. This is a great production/workflow tip for working with existing selections.

  1. Turn off both the Outline and Pink layer's visibility. We want to focus on the work path and the woman's dress.
  2. Lock the Woman Shopping layer so you don't accidentally select it.
  3. Return to the Paths palette and click once on the Woman Shopping path to activate it.
  4. Select the Direct Selection tool and drag a selection around the shopping bags. Be sure to select all the way up to her hands but try not to select the anchor points of her hand. Video Example.
  5. Copy the selected anchor points by clicking Cmd-C/Ctrl-C
  6. Create a new work path and be sure it's selected by clicking it once.
  7. Paste the copied anchor points by clicking Cmd-V/Ctrl-V

New Path from Copied Anchor Points

Step 6: Using the Pen Tool to Complete the New Path

We just saved some good production time by copying existing anchor points and pasting them on their own layer.

But the path isn't complete until we join the open anchor points and the Pen tool is just the tool we need.

  1. Select the Pen tool
  2. Resume the path by moving the Pen tool over one of the end anchor points. They will be at the top by the woman's hand. The Pen tool will change cursors and a small "square" will appear in place of the "x". This means you're ready to resume the path.
  3. Click the end point once when you see the small square appear next to the Pen cursor. Depending on your current path, you could have a really long bezier handle. If this is the case, Alt/Option-click the same anchor point you just clicked to delete the curve. Video Example.
  4. Continue clicking around the bag straps
  5. Complete the path by moving the Pen over the other endpoint and clicking it when you see a "O" appear next to the Pen cursor.

Step 7: Placing the Bags on a New Layer

  1. Create an active selection from the Bags work path by Cmd-clicking/Ctrl-clicking the thumbnail
  2. Return to the Layers palette
  3. Select the Woman Shopping layer and unlock it
  4. Create a new layer from selection by clicking Cmd-J/Ctrl-J. This takes the active selection around the Woman Shopping layer and puts only the selected area on its own layer.
  5. Name the new layer "Shopping Bags"
  6. Drag Shopping Bags layer above Pink layer
  7. Turn on visibility for both Pink and Outline layers

Shopping Bags and Outline

  1. Select the Eraser tool and erase the white outline around the bags. We want the bags to be natural looking with no outlines.

Step 8: Refining the Shopping Bags Selection

There's still some white background showing through the bag handles. This is annoying so we'll want to go back and modify the selection.

Bags

  1. Return to the Paths palette
  2. Select the work path with the bags
  3. Select the Pen tool. We're going to add paths to the current path.
  4. Using the Pen tool, create an outline around the white areas.
  5. Repeat 3-4 times until you've made all the selections. Be sure to complete each path by clicking at your starting anchor point when you see the small "O" appear next to the Pen cursor.
  6. Create an active selection by Cmd/Ctrl-Clicking the Bags work path layer.
  7. Make an inverse selection by clicking Cmd/Ctrl-I
  8. Delete everything outside the selection by clicking Delete/Backspace

Final Bag Selection

Step 9: Duplicating the Bags and Changing Their Color

Let's repurpose the existing shopping bags by duplicating them and modifying their colors.

  1. Duplicate the Shopping Bags layer by dragging the layer to the New Layer icon
  2. Using the Move tool and drag the Shopping Bags up to the woman's left hand
  3. Scale the bags by shift-clicking one of the corner transformation handles and dragging inward
  4. Hit Return/Enter to accept the transformation

Step 10: Changing the Colors

  1. Create a Hue/Saturation adjustment layer by Option/Alt-clicking the "Create new fill or adjustment layer" icon at the bottom of the Layers palette
  2. Select Hue/Saturation...from the options
  3. Check "Use Previous Layer to Create Clipping Mask" in the pop up dialog window
  4. Click OK
  5. Select Colorize from the Hue/Saturation window
  6. Adjust the Hue and Saturation sliders to change the colors of the bags
  7. Click OK

And that's it. Repeat for the dress, add some type and your effect is complete!

Silhouette Design - Final


SOURCE::http://www.cbtcafe.com/photoshop/silhouettedesign/index.html

read more... R�sum�abuiyad