
This is a great technique to create some advanced shapes and patterns yet it's a very simple technique.
Step 1: Getting Started
- Create a new document
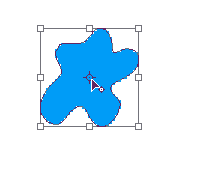
- Draw out a Shape
- Using one of the Shape Tools, click and drag to draw out a shape. In this example, I'm using the Custom Shape Tool.
 |
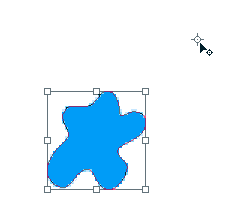
Step 2: Free Transform and edit center
- Click Command-T / Control-T on the keyboard to bring up the Transform handles
- Move the cursor over the center point of the selection and clicking and dragging the center point move it outside of the selection. In this example, I'm moving it to the top-right corner of the shape.
  |
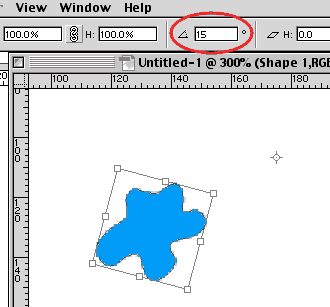
Step 3: Rotating the Shape
You can do this one of two ways.
- Go up to the Options Bar at the top, enter a value into the Rotate Field. This value will be a percentage. Values accepted are -180° to 180°.
- You can also move you cursor over the selection until you get the double sided curved arrows. This is the rotation cursor and you can click and drag to rotate the shape manually. This will also input a value into the Rotate Field.
Click the Enter Key to accept the transformation. This deselects the shape.
 |
Step 4: Duplicating the Shape
Click the Command-Option-Shift and clicking the T Key to duplicate and rotate the shape by the amount of the value in the Rotate Field.
Keep doing this until you've completed your new shape
 |
Step 5: Flattening Layer
In the Layers Palette, click the small black arrow at the top of the palette and select Merge Visible to flatten the layer.
For variety just change the shape and the angle of the rotation for new effects.
SOURCE::http://www.cbtcafe.com/photoshop/stepandrepeat/stepandrepeat.html
No comments:
Post a Comment