This is a technique you'll use a lot when working with images. It's very simple. Cropping refers to cutting down an image by cutting away unwanted parts. Cropping, unlike Image Resizing, does not affect resolution or quality. It just cuts away parts of the image you don't need or want.
Step 1: Getting Started
Open an image or graphic
 |
Step 2: Selecting the Crop Tool
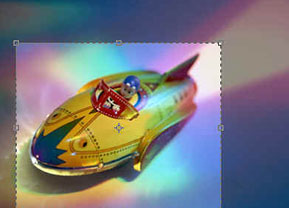
- With the Crop Tool selected, Click and Drag over the image.
- Release when you've selected the part of the image you want to keep. Don't worry about getting it just right, you can always go back and edit it.
- You will have a dashed line with little squares (selection handles) around the dashed line. This enables you to edit the selection by mousing over them and dragging in either direction to enlarge or decrease your selection.
- By default, Photoshop 6 will mask out the area that is not part of the selection. You can turn this on or off by going up top to the Options Bar and selecting/deselecting Shield Cropped Area.
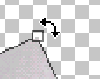
- To rotate move your cursor over one of the 4 corners until you see it change into a double sided arrow.
 |  |
To move the selection, simply move your cursor inside the selection until you see the solid arrow and then click and drag to reposition.
 |
To crop the selection, double-click inside the selection or click the Check Mark Button up top in the Options Bar.
SOURCE::http://www.cbtcafe.com/photoshop/cropping/cropping.html
No comments:
Post a Comment