Now the sky from Sunny Field is on our canvas, let’s transform it to the perspective of the “ground” layer. Activate the Transform tool (Ctrl/Cmd + T) and follow the instructions on the image below:
The saturation of the “sky” layer is just a bit too strong; we would need to lessen that. To achieve a lower saturation level, click on the “sky” layer and then press Ctrl/Cmd + U to activate the Hue/Saturation adjustment layer. When the box opens, use the following values:
- Edits: Master
- Hue: 0
- Saturation: -21
- Lightness: 0
Next, we will reduce the opacity of the “sky” layer since it is making the whole image look unreal. On the Layer window, reduce the Opacity to 80%.
When you’re done with that, we will now be erasing the area of the sky to create a horizon. Activate the Eraser tool (E) and use the following settings:
- Brush size: 500 px
- Hardness: 0%
- Opacity: 50%
- Flow: 100%
To reduce the Hardness of the brush, you simply right click on the image while the Eraser tool is activated (this also applies to the Brush tool) and then you would see the Hardness box and from there you can now change the Hardness of the brush।


Now that we’re done, let’s group these layers and rename the group to “background”। To create a Group, simply click on the Folder icon just beside the Create New Fill layer/Adjustment layer button on the Layer window and click on all the layers that we have created and drag them to the created Group.
Step 3 - Create the giant tacks
In this step we would be creating the giant pins, so to start, let’s open Earth pin 025। We would need to take that pin away from its background. To do that, let’s activate our Magnetic Lasso tool (L).

Now that it’s activated, left-click on any point on the tack and drag to form a selection area around it until you reach the point where you have started.

When you’re finished with that, let us now transfer that to our canvas using the Move tool (V)।

Once it is on our canvas rename this layer to “giant tack”, and then activate the Transform tool (Ctrl/Cmd + T) to rotate our image। See image below:

The color of this tack is a bit unpleasant so we would need to give it a retouch to change its awful hue. Activate the Magnetic Lasso tool (L) and then drag a selection area around the green plastic that holds the tack.

The color of this tack is a bit unpleasant so we would need to give it a retouch to change its awful hue. Activate the Magnetic Lasso tool (L) and then drag a selection area around the green plastic that holds the tack.
The color of this tack is a bit unpleasant so we would need to give it a retouch to change its awful hue. Activate the Magnetic Lasso tool (L) and then drag a selection area around the green plastic that holds the tack.
The color of this tack is a bit unpleasant so we would need to give it a retouch to change its awful hue. Activate the Magnetic Lasso tool (L) and then drag a selection area around the green plastic that holds the tack.
The color of this tack is a bit unpleasant so we would need to give it a retouch to change its awful hue. Activate the Magnetic Lasso tool (L) and then drag a selection area around the green plastic that holds the tack.
The color of this tack is a bit unpleasant so we would need to give it a retouch to change its awful hue. Activate the Magnetic Lasso tool (L) and then drag a selection area around the green plastic that holds the tack.
The color of this tack is a bit unpleasant so we would need to give it a retouch to change its awful hue. Activate the Magnetic Lasso tool (L) and then drag a selection area around the green plastic that holds the tack.
The color of this tack is a bit unpleasant so we would need to give it a retouch to change its awful hue. Activate the Magnetic Lasso tool (L) and then drag a selection area around the green plastic that holds the tack.
Now what we’re going to do is we would be changing the color of the plastic, so do not deselect the area that you have created around the pin; while the layer is highlighted and the area around the plastic is selected, activate the Hue/Saturation adjustment layer (Ctrl/Cmd + U) then use the following values below:
- Edit: Master
- Hue: -10
- Saturation: +4
- Lightness: -4
- Edit: Greens
- Hue: -112
- Saturation: -30
- Lightness: -30
After that, let’s further enhance the color by changing its color through a Color Balance adjustment layer. Go to Image > Adjustments > Color Balance and input the following values:
- Color Levels: +8, 0, -13
- Tone Balance: Midtones
- Preserve Luminosity: Checked
- Color Levels: +16, 0, -8
- Tone Balance: Shadows
- Preserve Luminosity: Checked
Now, let’s adjust the tacks exposure. Go to Image > Adjustments > Exposure and input the following values:
- Exposure: -0.35
- Offset: 0.0000
- Gamma: 1.05
When you’re done, change the Opacity of the tack to 96% to give it a little haziness.
If you’d notice there are bits of white on some edges of the tack which are from the original stock image’s background. We don’t want that, because it distracts the viewer and is aesthetically unacceptable. Activate the Eraser tool (E) and input the following values respectively:
- Brush size: 150 px
- Hardness: 100%
- Opacity: 100%
- Flow: 100%

Now let’s retouch the light on the tack। Activate the Burn tool (O); we would be using this to darken some areas on the tack.

Input the settings below for the Burn tool (O):
- Brush size: 150 px
- Range: Midtones
- Exposure: 15%

Now let’s activate the Dodge tool (O); we will use this tool to brighten specific areas on the tack। Use the same settings we used for the Burn tool (O).

end}
After that, we would need to create some reflection on the metal part of the tack to make it look more realistic. Activate the Clone Stamp tool (S) and input the following settings:
- Brush size: 40 px
- Mode: Normal
- Opacity: 25%
- Flow: 100%
To clone a region, press Alt + Left-click on an area and apply it on a specific region by holding the left-mouse button and dragging it on that area।

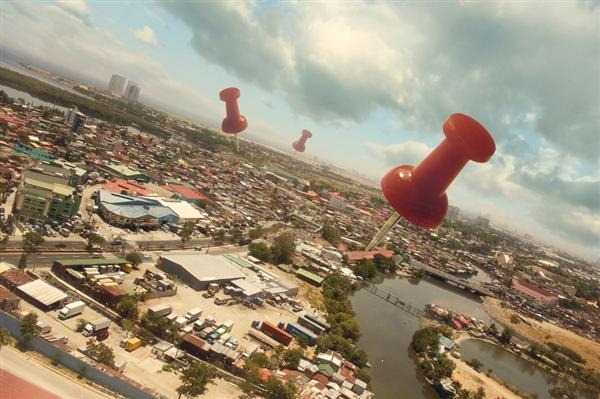
Now we are finished with the first tack, now it is time to create more of them. Click on the “giant tack” layer and press Ctrl/Cmd + J to duplicate it. Upon duplication, rename that layer to “giant tack 2”.
Activate the Transform tool (Ctrl/Cmd + J) and right click on the image to bring up the contextual menu and then once the menu is shown, click on Flip Horizontal। See image below for more instructions:

Duplicate that tack again and rename it to “giant tack 3”, and then activate the transform tool and click on Flip Horizontal from the contextual menu, and then this time reduce its opacity to 50%।

When you’re finished, group the layers that we created in this step and rename that group to “giant tacks”.
Step 4 - Give the image a retouch
In this step we would be retouching our whole image to give it a more picturesque output। So let’s start by creating a Solid Color adjustment layer from the Create New Fill layer/Adjustment layer button.

When the box opens, input the following value:
- #: 001135

Now the canvas is filled with a dark blue color, to apply that color to the image, change its Blending mode to Exclusion and change its Opacity to 40%.

Then let’s create another Solid Color, but this time input the value below:
- #: 695231
Change its Blending mode Soft Light and its Opacity to 25%. Let’s create another Solid Color and input the following value:
- #: cf9541
The Blending mode should be set to Soft Light and the Opacity to 15%. The image should be similar to this at present:

Next, let’s add a Gradient Map adjustment layer from the Create New Fill layer/Adjustment layer button.

When the Gradient Map box opens, pick the Black and white gradient; see image below:

After that, change its Blending mode to Luminosity and its Opacity to 70%. Next, let’s create a Brightness/Contrast adjustment layer.

Input the following values on their respective boxes:
- Brightness: 7
- Contrast: 0
Next, let’s saturate or increase the color of our image to liven it up. Create a Hue/Saturation adjustment layer from the Create New Fill layer/Adjustment layer button.

Input the following settings when the Hue/Saturation box opens:
- Edit: Master
- Hue: 0
- Saturation: +13
- Lightness: 0
Before we proceed to the next steps, it is recommended to save your image first as a PSD file so you may reload the image again if you see the need to edit some areas.

Step 5 - Soften the contrast of the image
What we are going to do here is that we would be softening the contrast of the image to make it look a bit dreamy. Before we move on, make sure you have saved the file as a PSD. Now we will be flattening the layers, to do that, right-click on any layer to bring up its menu and click on Flatten Image.

Once it is flattened, duplicate (Ctrl/Cmd + J) that single layer then go to Filter > Blur > Gaussian blur on the Menu bar and input the following:
- Radius: 16.0 pixels

Now your image is blurred, now this is a bit too dreamy, to achieve the dreamy effect, change its Blending mode to Lighten and the Opacity to 20%. Once you’re done, Flatten the image. After that, let us sharpen the image to bring out some details but still maintaining the soft contrast. Go to Filter > Sharpen > Smart Sharpen and input the following values:
- Basic: Checked
- Settings: Default
- Amount: 125%
- Radius: 1.0 pixels
- Remove: Gaussian Blur
- More Accurate: Checked

Final Results
No comments:
Post a Comment